Water Heater Anode Rod: Change, Replace, Remove, and Clean It Yourself
Your water heater is rumbling or the water smells funky, and you’re staring at the tank wondering what’s wrong. The anode rod is usually the culprit, and fixing it is a straightforward job.
This guide gives you the practical steps to handle it. We will cover when to change the rod, how to remove a seized one, the full replacement process, and whether cleaning is ever worth it.
I’ve done this repair in my basement and on hundreds of service calls. The short takeaway: check this part every three years, and you’ll avoid a much more expensive problem.
An Anode Rod: Your Water Heater’s Silent Bodyguard
Think of your water heater tank as a knight in armor. The anode rod is the shield. When corrosive elements in the water attack, they hit the shield first. The shield gets destroyed so the knight does not. This is cathodic protection, and it’s the only thing stopping your steel tank from rusting out from the inside.
Physically, it’s a long metal rod, typically 3/4 inch in diameter and up to 5 feet long. It screws directly into a port on the top of your water heater tank. You’ll find it made from either magnesium or aluminum alloy.
Its entire job is to be more “attractive” to corrosion than the tank’s steel walls. The minerals in your water will eat away at the anode rod’s softer metal. This sacrifice can add 5 to 10 years to your heater’s life. The rod corrodes first, so the tank does not.
You have three main types: magnesium (common, works well in most water), aluminum (often used with softer water), and powered anode rods (an electronic version). We’ll get into picking the right one later.
DIY vs. Pro: The Anode Rod Verdict
Here’s my honest rating. Removing a standard anode rod is a 5 out of 10 on the DIY difficulty scale. Removing a rod that’s been in place for 15 years and is fused by corrosion is an 8 out of 10. Your situation will fall somewhere in between.
The ideal DIY job looks like this. You have a gas water heater in an open basement or garage with clear overhead space. The heater is less than 10 years old. You own a 1-1/16 inch deep socket, a long breaker bar, and you’re ready to use some muscle.
Call a licensed plumber for these specific situations.
- The rod is severely stuck and won’t budge with significant, careful force.
- Your heater is in a cramped closet or attic with no room for a long breaker bar.
- You have an electric heater and live wiring is routed directly over the anode rod port.
- The thought of applying steady, heavy torque to a fitting on your water heater makes you nervous.
Safety is not optional. Before you touch the anode rod, you must turn off the power to the heater (flip the circuit breaker for electric, turn the gas valve to “pilot” for gas) and shut off the cold water supply valve. Forgetting this step risks severe scalding from hot water or a dangerous electrical shock. Proper safety guidelines should always be followed.
The Toolbox: What You Need to Get the Job Done
Before you touch a single tool, gather everything on this list. Walking back and forth from your basement to the garage is a sure way to turn a 30-minute job into a frustrating afternoon. I learned that the hard way on my first water heater service call.
The Essential Tools Checklist
- 1-1/16″ Deep Socket: This fits the hex head on 99% of standard anode rods. A standard-depth socket will bottom out before it grips. A deep socket is non-negotiable.
- Breaker Bar or a Length of Pipe (at least 2 feet): Your standard ratchet doesn’t have the leverage. Anode rods are installed very tight. A breaker bar is ideal. A sturdy piece of pipe that fits over your ratchet handle works just as well.
- Adjustable Wrench or Channel Locks: You need this to hold the nipple at the top of the water heater if your anode rod is combo-style (connected to the hot water outlet).
- Ratchet Drive: This connects your deep socket to the breaker bar. A 1/2-inch drive is best for the high torque.
- Garden Hose: You’ll need this to relieve tank pressure and to drain the small amount of water that will spill.
The Materials You Must Have
- The Correct Replacement Anode Rod: Check your water heater manual or the existing rod. You need the right diameter, length, and connection type (standard hex head or combo nipple). Using the wrong one means starting over.
- Pipe Thread Sealant: Choose either high-quality PTFE (Teflon) tape or liquid pipe thread sealant (pipe dope). Apply it to the threads of the new rod to prevent leaks and make future removal easier. I prefer a good paste dope for this job.
- Plenty of Rags or Old Towels: You will get wet. Have a stack ready for the minor spillage when you break the rod loose.
Here is the key question answered upfront: you can replace the anode rod without draining the 40 or 50 gallons in your entire water heater, but you absolutely must shut off the water supply and relieve the pressure inside the tank. If you skip this step, you will create a hot water geyser in your utility room.
The “Hail Mary” Tools for a Stuck Rod
Sometimes, an old rod is fused in place by years of heat and minerals. If your breaker bar and all your strength won’t budge it, this is your escalation path.
- Penetrating Oil (like PB Blaster or Liquid Wrench): Spray it generously around the base of the anode rod’s threads at the tank top. Let it soak for at least an hour, reapplying once or twice. Patience is your friend here.
- Impact Wrench: A heavy-duty electric or pneumatic impact gun can deliver the sudden, shocking torque needed to break the corrosion bond. Use it with caution and your deep socket.
- Propane Torch (Use Extreme Caution): This is the last resort. Applying direct heat to the water heater’s tank fitting can expand the metal and break the bond. You must completely shut off the gas or power to the water heater and ensure no flammable materials are nearby. This is a pro-level maneuver due to the obvious fire and safety risks.
If the rod breaks off inside the tank, your job just became a full water heater replacement. The goal is to use enough controlled force to get it out without reaching that point. Start gentle, increase leverage, and escalate tools slowly.
Spotting a Worn-Out Anode Rod: The Telltale Signs
You know it’s bad when your water heater starts telling you. These signs are your water heater’s final distress calls. If you’re noticing any of these symptoms, your anode rod is already severely depleted and your tank is actively corroding.
Rotten Egg Smell (Sulfur)
That awful smell from your hot water isn’t your plumbing’s fault. It’s chemistry. Certain bacteria in your water feed on sulfate. A healthy magnesium anode rod creates a reaction that suppresses these bacteria. When the rod is gone, the bacteria thrive and produce hydrogen sulfide gas. That’s the smell. This sulfur smell from only the hot water taps is one of the most reliable signs your anode rod is finished. I’ve had this call many times, and a new rod almost always fixes it.
Rusty Water from the Hot Side Only
Fill a white bucket with cold water. Looks clear. Now fill it with hot water. See a reddish or brownish tint? That’s tiny bits of your tank’s steel lining. The anode rod sacrifices itself to protect that steel. When the sacrificial metal is gone, the tank starts to rust. Rusty discoloration that appears only in your hot water is a direct signal that the anode rod is no longer doing its job.
Rumbling or Popping Sounds
A healthy tank heats water quietly. A corroding tank has a layer of sediment and mineral scale (like limescale) hardened on the bottom. As the heating element or gas burner heats this crust, trapped water boils and pops. You’ll hear a low rumbling or loud popping. Those sounds mean sediment has built up, which happens faster once the anode rod fails and tank corrosion begins.
Visible Corrosion on Hot Water Fixtures
Check the aerators on your kitchen and bathroom faucets. Unscrew them and look inside. Now, check a toilet supply line, which only carries cold water. If you see more crusty, white, or green corrosion build-up on fixtures that use hot water, it’s a clue that corrosive elements are no longer being neutralized by the anode rod.
Proactive Inspection is the Real Solution
Waiting for these signs is a gamble with your water heater’s lifespan. By the time you smell sulfur or see rust, the protective rod has been gone for months. The tank is already corroding. The only way to truly know the condition of your anode rod is to physically remove it and look at it. I check the rod in my own home heater every two years. It takes 20 minutes and costs nothing. Mark a yearly reminder on your calendar to inspect it.
How Your Water Quality Attacks the Rod
Two common water conditions eat anode rods for breakfast.
Water softeners replace hardness minerals like calcium with sodium. This makes the water more conductive. Softer, more conductive water dramatically increases the rate of the sacrificial reaction, causing the anode rod to corrode away much faster. For readers refreshing their understanding of how these systems work, our water softeners work guide offers a concise overview. If you have a softener, plan on checking your anode rod every year, without fail.
Well water with high sulfur content creates a double-whammy. The sulfur bacteria accelerate the rod’s consumption, and as the rod dissolves, it can feed the bacteria, making the rotten egg problem cyclical. For well water users, using an aluminum-zinc alloy anode rod instead of a standard magnesium one can often solve the smell and last longer.
The Main Event: Step-by-Step Removal and Inspection
Let’s get to work. Pulling the anode rod is a straightforward job if you follow these steps and respect the basics of water heater safety, especially understanding the purpose of the anode rod.
How to Remove a Water Heater Anode Rod
- Turn Off the Power: For an electric heater, shut off the breaker at the main panel. For gas, turn the control knob to “Pilot” or “Off.”
- Turn Off the Cold Water: Find the cold water inlet valve on top of the heater and turn it clockwise until it stops.
- Relieve the Pressure: Open a hot water faucet somewhere in your house, like a bathroom sink. This prevents a vacuum and stops hot water from spraying out when you open the tank.
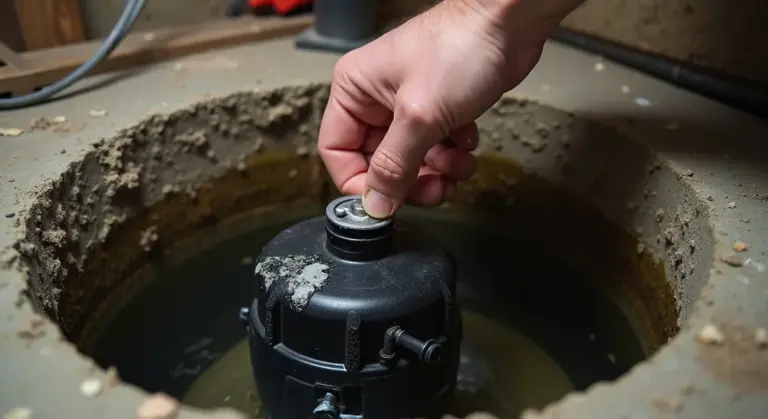
- Locate the Anode Rod: Look on the very top of the water heater tank. It’s usually under a hexagonal plastic cap, sometimes labeled. Unscrew the cap. You’ll see a large hexagonal plug head (typically 1 1/16″ for standard rods).
If you can’t find the anode rod on top, the manufacturer might have installed it in the hot water outlet nipple. This means the hot water pipe is connected directly to the rod. You must disconnect the hot water line at the heater to access it. Some newer models also have a combo unit where the anode is part of the hot water outlet fitting itself. Regular maintenance should include checking the anode rod every 1-3 years to see if it needs replacement. The replacement frequency depends on water quality and how hard the water is.
Detail the removal technique: using the socket and breaker bar, turning counter-clockwise, and how to manage water spillage.
- Fit a deep well socket (usually 1 1/16″) onto the anode rod’s hex head. Attach this to a long breaker bar or a strong ratchet. A regular ratchet often won’t provide enough leverage.
- Place a bucket or several rags directly beneath the anode port. Water will spill out when you break the seal.
- Push down on the breaker bar with steady, increasing force, turning it counter-clockwise. It will be very tight. A helper holding the water heater tank steady can be useful.
- Once broken free, unscrew the rod by hand. Be ready for it to be heavy, wet, and possibly very long. Let the water drain into your bucket.
The Stuck Rod: What to Do When It Won’t Budge
This is the most common hurdle. Heat and minerals cement that rod in place over years. Don’t just jump to brute force.
- Penetrating Oil: Your first move. Soak the threads where the rod enters the tank with a quality penetrant like Liquid Wrench or PB Blaster. Let it sit for an hour, reapplying once or twice. Tap the fitting gently with a hammer to help vibration.
- Apply Heat: If oil fails, carefully use a propane torch to heat the tank’s boss (the female fitting the rod screws into). Do not heat the rod itself. Heat expands the female fitting, breaking the mineral bond. Keep the flame moving and away from any flammable materials or gas lines.
- The Impact: This is your last resort before calling a pro. Use an impact wrench on the socket. The sudden, hammering torque can shock the fitting loose where steady pressure fails. Be cautious, as you can strip the hex head or damage the tank fitting.
If it still won’t move, you’re at a decision point. Forcing it further risks a major tank leak. At this stage, installing a new anode in the hot water outlet might be your best path forward.
Inspecting the Rod You’ve Pulled Out
Now, the diagnosis. What you see tells you everything about your water and the tank’s health.
A good anode rod will have most of its sacrificial metal remaining. It might look a bit rough or knobby, but the core wire will still be thickly coated. If you have 1/2 inch or more of material over the core wire along most of its length, you can probably put it back. I check mine every two years, and it usually goes back in.
A bad rod is unmistakable. You’ll see one of three things:
- Severe Corrosion: The metal is gone, leaving less than 1/2 inch of the thin steel core wire. It looks skinny and pathetic.
- Complete Dissolution: The rod is gone except for the very top plug section. This happens with very aggressive water.
- Hard Calcium Coating: The rod is encased in a rock-hard, white crust. This is scale from hard water, and it insulates the rod, making it useless.
So, can you clean a water heater anode rod? Yes, but only in one case. If the rod is structurally sound but coated in scale, you can chip the crust off with a screwdriver and a wire brush. Wear safety glasses. If the rod is corroded down to the core wire, cleaning does nothing. The sacrificial material is gone. You must replace it. A scaled rod that you clean will work again, but it may corrode faster now that its surface area is exposed.
Choosing and Installing Your New Anode Rod
You have the old rod out. Now you need the right replacement and to get it installed correctly.
What Type of Anode Rod Should You Buy?
There are three main types, and your water quality is the deciding factor. Choosing the wrong anode rod can lead to premature tank failure or cause a rotten egg smell in your hot water.
| Rod Type | Best For | Watch Out For |
|---|---|---|
| Magnesium | Standard city water. It offers the strongest, fastest sacrificial protection for your tank. | It’s softer and corrodes quicker. In water with sulfate, it can react and cause a sulfur (rotten egg) smell. |
| Aluminum/Zinc (Aluminum Alloy) | Well water or water softeners. It’s harder, lasts longer, and is less likely to cause odor. | It’s slightly less effective at protection than magnesium. Not ideal for drinking water if you have aluminum sensitivity concerns. |
| Powered (Impressed Current) | Any installation, especially where access is terrible. It doesn’t corrode, so it never needs replacement. | It’s expensive. It requires a nearby electrical outlet and will fail if the power goes out for extended periods. |
My own tank is on softened well water, so I run an aluminum/zinc rod. It stopped the occasional sulfur smell I got with magnesium. Softened water isn’t always ideal for aquariums.
Getting the Correct Size and Length
This step is critical. A rod that’s too short won’t protect the top of your tank. Grab a tape measure.
- Measure the length of your old rod.
- Note the thread size (usually 3/4″ NPT for residential tanks).
- Match these specs exactly when ordering.
If your water heater is in a closet or basement with low headroom, a standard full-length rod is impossible to install. For low-clearance installations, use a segmented or flexible anode rod that you can bend or assemble inside the tank. I keep a flexible one on my shelf for service calls in tight spots.
Step-by-Step Installation
With the right rod in hand, installation is straightforward. Remember, your water is still off and the tank is drained.
- Clean the threads in the tank’s opening with a rag.
- Apply 3-4 wraps of PTFE thread sealant tape (plumber’s tape) clockwise around the new rod’s threads. Do not use pipe dope or liquid compound.
- Start threading the rod into the tank by hand. It should turn smoothly.
- Once hand-tight, use your wrench (and breaker bar if needed) to snug it up. You only need to turn it an additional 1/4 to 1/2 turn past hand-tight. Over-tightening can strip the threads in the tank, which is a major repair.
Final Steps to Get Your Hot Water Back
The hard part is over. Now you need to refill the tank safely.
- Close the drain valve you opened earlier.
- Turn the cold water supply valve on fully.
- Go to a hot water faucet in your house (like a laundry sink) and turn it on hot only. This lets air escape as the tank fills.
- Wait until water flows from the faucet steadily with no sputtering. This means the tank is full and air is purged. Turn the faucet off.
- Now you can restore power to your electric heater or relight the pilot on your gas model.
- Check the new anode rod fitting and the drain valve for any leaks while the tank pressurizes. A minor drip might just need another slight tighten.
Your water heater is now protected. Mark your calendar to check the new rod in 3-5 years.
The Anode Rod Maintenance Roadmap
Think of your anode rod as a bodyguard for your water heater tank. It sacrifices itself to stop rust. A good maintenance schedule is how you make sure that bodyguard is still on duty. Here is a simple plan to follow.
Create Your Simple Action Schedule
You do not need a complicated calendar. Anchor your anode rod check to an easy-to-remember annual event, like the start of summer or when you change your smoke detector batteries. This is the basic cycle.
- Year 1: Do your first inspection. This sets your baseline.
- Year 2 & 3: Inspect again. Compare to your first check.
- Year 4+: Follow your personalized replacement interval.
- Every Year: Pair the anode rod check with a quick tank flush.
Years 1-3: The Crucial Initial Inspection
The first time you pull the rod tells you everything about your water’s aggressiveness. Do this within the first three years of a new heater’s life, or as soon as you move into a home.
- Turn off the power (breaker) or gas (valve) to the heater.
- Shut off the cold water supply valve on top of the heater.
- Attach a garden hose to the drain valve and run it to a floor drain or bucket.
- Open a hot water faucet in the house to relieve pressure.
- Drain about 5 gallons from the tank to lower the water level below the anode rod port.
- Use a 1-1/16″ deep socket and a long breaker bar or impact wrench to unscrew the anode rod from the top of the tank.
Pull the rod out and look at it. A new rod is thick and mostly smooth. You are checking how much of the sacrificial metal has been eaten away. If over 50% is gone or it’s less than 1/2 inch thick, plan to replace it soon. If it’s heavily coated in white calcium, your water is hard. Take a picture for your records.
Set Your Replacement Interval
Your initial inspection gives you the answer. Corrosive water eats the rod fast. Soft or neutral water lets it last longer.
- If the rod was 50% gone in 3 years, replace it every 3 years.
- If it looked nearly new after 3 years, you can stretch to a 5-year schedule.
- If it was completely gone or a skinny wire, you have very aggressive water. Check it every 1-2 years and consider a powered anode.
Write your chosen interval on a piece of tape and stick it to the side of your water heater.
Integrate with Annual Water Heater Maintenance
You already drained some water to check the rod. Go one step further and do a full sediment flush. This prevents buildup that steals efficiency and tank life.
- With the power and water still off, and your hose connected, open the drain valve fully.
- Let the tank empty completely. Watch the water. If it’s full of sandy sediment, you needed this.
- Briefly turn the cold water supply back on to stir up and flush out any remaining debris.
- Close the drain valve, refill the tank, turn the water supply back on, and restore power or gas.
Doing both tasks together saves you time and ensures you remember the flush. It takes an extra 15 minutes and adds years to your heater.
A Note on Older Water Heaters
This is the hard truth from the service truck. If your water heater is over 10 years old and the anode rod has never been changed, the tank is likely corroded from the inside. The anode rod sacrificed itself completely years ago. That’s the moment you start weighing repair versus replacement. In many cases, a ten-year-old tank with a spent anode points toward replacement as the more reliable long-term option.
Replacing it now might not save the tank. The fresh rod will try to protect the steel, but the existing rust pits can already be deep enough to cause a leak. At this age, consider the new anode rod as a possible extension of life, not a guarantee. Start budgeting for a replacement heater.
Your Top Anode Rod Questions, Answered
Here are the most common questions I get from homeowners, based on hundreds of service calls and my own projects.
How often should I change my anode rod?
Forget a set schedule. You check it, the rod tells you when it’s done. I pull mine every 12 months. Your water type is the boss here.
Bad water eats rods faster. If you have smelly water or a softener, inspect it every year. With very hard water, you might get 3 to 5 years. The only right answer comes from looking at the rod yourself once a year.
What happens if I take the anode rod out and don’t replace it?
The tank starts to rust. It’s that simple. The anode rod sacrifices itself so the steel tank doesn’t. Remove the sacrificial part, and the tank becomes the target.
You’ll get brown, rusty water first. Then, you’ll find a pinhole leak. Finally, the tank fails completely, often with a major leak. Leaving the anode port empty guarantees a premature, costly water heater replacement. Always plug the hole with a new rod or a brass plug if you’re installing a powered anode.
Do powered anode rods work?
Yes, they work. I installed a powered anode in my own heater five years ago. They stop corrosion by sending a low-voltage charge through the water, instead of dissolving like a metal rod.
Let’s compare the two options side by side.
| Standard Magnesium/Aluminum Rod | Powered Anode Rod |
|---|---|
| Lasts 3-5 years, needs replacement | Lasts for the life of the heater |
| Can cause “rotten egg” smell in some water | Eliminates sulfur smell completely |
| Low upfront cost ($20-$50) | High upfront cost ($100-$200) |
| Simple to install (if not stuck) | Requires an electrical outlet nearby |
Powered rods are an investment that pays off if you plan to keep your heater for a long time and want zero maintenance.
How long does it take to replace a water heater anode rod?
With everything ready and the rod not stuck, plan for 30 to 60 minutes. That includes draining a few gallons, breaking the rod loose, swapping it, and tightening everything up.
The big “if” is a stuck rod. I’ve spent over two hours on one with a long breaker bar, heat, and penetrating oil. Your timeline depends entirely on how willing the old rod is to come out of its threads. Always have a backup plan if you can’t break it free.
Can I check the anode rod myself?
Absolutely. This whole guide is to show you that you can. It’s a basic maintenance job that saves you money and teaches you about your system.
You need a 1-1/16″ socket, a long breaker bar, and a garden hose. Shut off the power and water, drain a little water from the tank, and loosen the hex head on top of the heater. Pull it out and look. If it’s less than 1/2″ thick at any point, replace it. Checking it yourself puts you in control and can double the life of your water heater.
Common Questions
Can I clean my old anode rod instead of replacing it?
Only if it’s coated in hard, white mineral scale and the core metal underneath is still thick. Chip off the crust with a screwdriver and wire brush. If the rod is corroded down to a skinny wire, cleaning is useless-the sacrificial material is gone and you must replace it.
Will a lot of water spill out when I remove the rod?
Some water will spill, but not the entire tank’s worth. Once you shut off the water and relieve pressure, the water level will be just below the top of the tank. Have a bucket and plenty of rags ready for about a half-gallon of spillage when you break the seal.
What’s the best way to prevent the anode rod from getting stuck in the future?
Use a quality pipe thread sealant (like a paste dope) on the new rod’s threads during installation. This lubricates the connection. Also, make a note to inspect it every 2-3 years; regular checks prevent it from becoming permanently fused by decades of corrosion.
Does the process differ for electric versus gas water heaters?
The core mechanical steps are identical. The critical difference is safety: for electric, you must shut off the circuit breaker. For gas, turn the control knob to “pilot.” Always shut off the cold water supply first, regardless of the heater type.
If I see signs of a bad rod, how urgently do I need to act?
Act within a few weeks. Those signs mean the rod is depleted and your tank is actively corroding. While a leak won’t happen overnight, every day you wait increases the damage. Schedule the replacement as your next weekend project.
Your Anode Rod Action Plan
Check your anode rod every single year. Replacing a corroded rod is a simple, cheap fix that stops your water heater tank from rusting out.
Bob McArthur
Bob is a an HVAC and plumbing industry veteran. He has professionally helped homeowners resolve issues around water softeners, heaters and all things related to water systems and plumbing around their homes. His trusted advice has helped countless of his clients save time, money and effort in home water systems maintenance and he now here to help you and give you first hand actionable advice. In his spare time, Bob also reviews home water systems such as tankless heaters, water softeners etc and helps home owners make the best choice for their dwelling. He lives around the Detroit area and occasionally consults on residential and commercial projects. Feel free to reach out to him via the contact us form.