Keep Your Sump Pump Flowing: A Cold-Weather Guide to Preventing, Thawing, and Fixing Frozen Lines
Your sump pump’s discharge line froze solid and now your basement is at risk. I see this every winter, and the fix starts with knowing what to do right now.
We will cover how to stop lines from freezing, the safest way to thaw them without damage, and how to repair or replace a burst hose or pipe.
I’ve been a water systems tech for 15 years and this is my own winter checklist. Your first move is always to shut off the pump and check for ice blockages before anything else.
Can a Sump Pump Line Freeze? The Cold, Hard Science
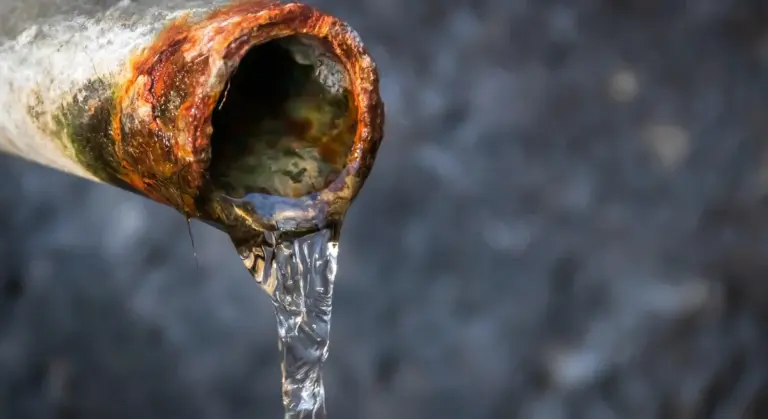
Yes. Your sump pump discharge line can absolutely freeze. It happens all the time. The science is simple but destructive. Water expands when it freezes. That expansion creates immense pressure inside the pipe.
That pressure has to go somewhere, so it finds the weakest point in your pipe or hose and bursts it open.
Not all pipe materials handle this pressure the same way. What your line is made of changes your risk.
- Rigid PVC or ABS Pipe: This is common for permanent installations. It’s strong, but brittle when cold. When the ice expands, it doesn’t flex. It cracks or shatters, often creating a long, messy split.
- Corrugated Discharge Hose (Flexible): The ribbed plastic hose you often see temporarily snaking across a yard. The corrugations can trap pockets of water. These pockets freeze, expand, and split the seams between the ribs. It’s more flexible than PVC but still very vulnerable.
Knowing where your line can freeze is just as important as knowing how. These are the danger zones.
- Above-Ground Discharge: Any section of pipe or hose lying on the ground, running up a wall, or dangling from an outlet is a prime target. The first cold snap will get it.
- Unheated Crawl Spaces or Garages: If your discharge line runs through a space that drops below freezing, it’s at risk. My own crawl space gets cold enough to freeze a line if it’s not insulated.
- Lines Buried in Shallow Frost Lines: A common mistake. If you buried your discharge pipe to hide it, but only put it 6 inches down, the winter frost can reach it and freeze it solid underground. That’s a terrible repair.
Your Winter Prevention Toolkit: Stop Freezes Before They Start
How do you prevent your sump pump lines and discharge hoses from freezing? You act before the first hard frost. Here’s your toolkit and your action plan.
Gather these materials:
- Pipe Insulation: Foam pipe sleeves or fiberglass wrap.
- Heat Tape: Electrical tape that warms the pipe. Get the automatic, self-regulating kind.
- Zip Ties or Duct Tape: To secure insulation.
- A Shovel: For adjusting discharge paths or checking burial depth.
- Downspout Extensions: To direct roof runoff away from your sump pump’s discharge area.
Follow this fall maintenance checklist every year:
- Disconnect and Drain Seasonal Hoses: If you use a temporary above-ground hose, disconnect it from the pump outlet and the discharge point. Drain all water out and store it in a garage or shed for winter.
- Reroute Discharge Away from Foundation: Ensure the water exiting your permanent line flows away from your house. If it pools nearby, it can seep back into your foundation and refill your sump pit, or create an ice hazard.
- Insulate All Exposed Pipe: Every inch of pipe in an unheated space or above ground must be insulated. Slit foam sleeves are the easiest. Wrap them tightly and seal the slit with duct tape.
You have two main setup choices. One is permanent, one is seasonal.
Permanent burial below the local frost line is the best, most reliable solution. The frost line is how deep the ground freezes in your area (often 30-48 inches down). A pipe buried deeper than that is in constantly unfrozen earth and will not freeze. It’s more work and cost upfront, but you’ll never think about it again.
A seasonal above-ground hose setup is common but high-maintenance. You must remember to disconnect, drain, and store it every fall. Forget once, and you’ll have a burst hose and a flooded basement come spring.
The Right Insulation for Your Pipe: A Quick Guide
Not all insulation is equal. Your choice depends on your climate and setup.
Foam Pipe Sleeves (like foam pool noodles for pipes): These are easy and cheap. You slit them, wrap your pipe, and tape them closed. They work well for moderate cold and are perfect for DIYers. They don’t handle extreme, prolonged cold as effectively.
Fiberglass Wrap: This is the pink or yellow insulation you see on house walls. It comes in rolls. You wrap it around the pipe and secure it with zip ties or tape. It provides better thermal protection than foam in severe cold. It’s messier to work with (wear gloves) but more effective.
Electrical Heat Tape is a powerful tool, but you must use it correctly. This is a electrical cable you wrap along the pipe that provides gentle heat. It is only for the discharge pipe itself. Never use it on or inside a submersible sump pump. Most importantly, the outlet you plug it into must be a GFCI (Ground Fault Circuit Interrupter) outlet for safety. Use self-regulating heat tape that adjusts its own heat output so you don’t have to remember to plug it in and out.
Emergency Thawing: Safe Methods for Frozen Lines

You found ice. Now you need to get the water moving again without wrecking your pipes or your house. Here’s how.
The Most Important Rule
You must never use an open flame or a blowtorch to thaw a frozen pipe. This is not a suggestion. A torch can scorch PVC piping in seconds, melt rubber hoses, and start a fire in your wall or basement. The risk is not worth the slightly faster thaw time.
How to Find the Frozen Blockage
First, locate the freeze. Follow the discharge hose or pipe from your sump pump pit to where it exits your house. The frozen spot is almost always where the pipe is exposed to cold air. Check these common areas first, especially when looking for signs of sump pump issues related to freezing or blockage:
- The section of pipe in an unheated crawl space or basement rim joist.
- The vertical section where the pipe goes up to exit through the wall.
- The exterior discharge hose lying on the ground outside.
Look for frost on the pipe or a slight bulge. If you’re unsure, feel along the pipe. It will be noticeably colder and solid where it’s frozen.
Safe Thawing Methods (From Best to Good)
Always start thawing at the end closest to the pump and work toward the blockage. This lets melting ice and steam escape safely.
1. Warm Towels Soaked in Hot Water
This is the safest, most controlled method for accessible pipes.
- Heat a pot of water on the stove. It should be hot, but not boiling.
- Soak several old towels or heavy rags in the hot water and wring them out.
- Wrap the towels tightly around the frozen section of pipe.
- Re-soak and re-wrap the towels as they cool.
The gradual heat transfer from the towels thaws the ice slowly and evenly, which greatly reduces the risk of cracking the pipe from thermal stress.
2. Hair Dryer or Heat Gun on LOW
This works well for targeted spots. Use extreme care.
- Set the tool to its lowest heat setting.
- Keep it moving constantly over the frozen area. Do not hold it in one spot.
- Never point the hot air at the same spot on plastic pipe for more than a few seconds.
- Keep the dryer and its cord far away from any pooled water or the sump pit.
3. Portable Space Heater
Use this for thawing a pipe in an enclosed, unfinished area like a crawl space.
- Place the heater several feet away from the pipe, pointing in its general direction.
- Ensure the heater is on a level, dry surface away from all combustibles (wood, insulation, rags).
- Never leave it unattended. Monitor it closely and turn it off once the pipe is thawed.
Once water starts to flow, go outside and make sure the final discharge point is clear of ice and debris. A blocked exit will just cause the line to freeze again immediately.
What Helped Me
My old garage-sale hair dryer is my go-to tool for this job. It’s underpowered for hair, but its low, steady heat is perfect for gently warming a frozen PVC pipe without the risk of melting it. I keep it in my basement toolbox just for this purpose every winter.
Damage Assessment: Did the Freeze Cause a Burst Pipe?
Water expands when it freezes. This expansion has incredible force, enough to split metal. Plastic pipes and hoses don’t stand a chance. Once you suspect a thaw is happening or you’re inspecting after a deep freeze, you need to look for these red flags immediately. To prevent this damage, explore frozen pipes prevention solutions like insulation and heat tape. Keeping a slow drip from faucets during extreme cold is another simple safeguard.
Your first job is to become a detective, looking for the clear signs of a failure before you even think about turning the pump back on.
The Red Flag Troubleshooting Guide
Look for these specific warnings. If you see any one of them, you have a rupture that needs repair.
- Water spraying or dripping at a joint or coupling.
- A visible crack or split in a PVC pipe.
- A bulging, distorted section on a flexible discharge hose.
- The pump runs but no water exits the discharge line outside.
Understanding the Red Flags
Each sign tells you exactly what happened and where.
Water spraying from a joint means the ice pushed the pipe right out of its fitting or cracked the fitting itself. A visible crack in PVC is the most obvious fail. The ice had nowhere to go, so it split the pipe wall open.
A bulging hose is a sure sign of an internal split; the inner liner has ruptured, and the outer reinforcement is holding the water like a balloon, which will fail soon.
If the pump runs but nothing comes out, the blockage is still there, or the water is leaking from a burst section back into your sump pit or onto your basement floor. I was on a service call where this happened, and the homeowner had a motor running dry for hours. We had to replace the pump, not just the pipe. This is one of those common sump pump failure causes that you should be aware of.
Immediate Action: The Emergency Shutdown
The moment you confirm any damage, your next move is not to fix it. It’s to prevent more damage.
- Go directly to your home’s main electrical panel (breaker box).
- Find the breaker labeled for your sump pump or the basement outlets. If it’s not labeled, you may need to identify it by process of elimination.
- Flip that breaker to the OFF position. This cuts all power to the pump.
Shutting off the power stops two big problems: it prevents the pump motor from burning out by running dry against a blockage, and it stops the pump from pushing more water into a broken line and flooding your basement. You can safely shut down the well pump electrical before attempting any repairs.
Only after the pump is safely off should you move on to planning the repair for the split pipe or hose.
Repairing the Damage: Patching and Replacing Sections
You found ice, thawed it, and now there’s water spraying from a crack. The repair is straightforward. You cut out the bad section and put in a new one. Your main decision is whether to tackle it yourself or call a plumber.
DIY or Call a Pro? The Verdict
This is a common DIY job, but your comfort level with tools matters. Here’s my take from fixing these in basements and under crawl spaces for years.
Repairing a PVC pipe is a moderate DIY project, I’d rate it a 6 out of 10 on the difficulty scale. It requires precise cutting and working with chemical cement. If you have one clean break in an accessible spot, you can handle it. If the pipe is shattered in multiple places or the damage is buried against your foundation, call a pro.
Replacing a corrugated plastic discharge hose is an easy DIY task, a 2 out of 10. It’s essentially disconnecting an old garden hose and clamping on a new one. Anyone can do this.
Tools and Materials You’ll Need
Gather your gear first. Nothing is worse than being under the pump with glue on your hands and realizing you’re short a fitting.
- For PVC Pipe: Hacksaw or PVC tube cutter, measuring tape, utility knife, PVC primer (purple cleaner), PVC cement, a straight coupling, and a new section of PVC pipe of the same diameter (usually 1.5″ or 2″).
- For Corrugated Hose: Slotted screwdriver or nut driver, new corrugated discharge hose (same inner diameter, typically 1.5″), and two stainless steel hose clamps.
- Universal: Safety glasses, gloves, a bucket or shop vac for residual water, and a dry rag.
Step-by-Step: Repairing a PVC Discharge Pipe
This is the most permanent fix. In my own home, I use solid PVC pipe from the pump to where it exits the house because it’s less likely to sag and trap water.
- Turn off and unplug the sump pump. This is non-negotiable. You are working with water and electricity.
- Use a hacksaw or PVC cutter to remove the damaged section. Cut straight and clean, about an inch past the crack in each direction.
- Dry the pipe ends inside and out with a rag. Use the utility knife to remove any burrs or rough plastic from the cut edges.
- Measure the gap. Cut a new piece of PVC pipe to fit, accounting for the depth the pipe will go into the coupling on each end.
- Dry fit everything first. Put the coupling on one existing pipe, then the new piece, then the other side. Make sure it fits before you glue.
- Apply PVC primer to the outside of the pipe ends and the inside of the coupling. Let it dry for a few seconds.
- Apply a thin, even layer of PVC cement over the primed areas. Quickly push the pipe into the coupling, give it a quarter turn to spread the cement, and hold it firm for 15 seconds. Repeat for the other side. Wipe away any excess cement.
- Let the joint cure for at least 30 minutes, or as long as the cement label recommends, before turning the pump back on.
Step-by-Step: Replacing a Corrugated Discharge Hose
This is the quick fix. I keep a spare 10-foot section in my garage for emergencies.
- Again, ensure the pump is off and unplugged.
- Loosen the hose clamps at the pump outlet and where the hose terminates outside using your screwdriver. Slide the clamps back onto the old hose.
- Pull the old hose off. It might be stuck. A little twisting usually breaks the seal.
- Slide new hose clamps onto each end of the new hose.
- Push the new hose firmly onto the pump discharge outlet. Slide the clamp into place and tighten it securely. Do the same at the discharge point outside.
- Ensure the hose has a consistent downward slope away from your house with no dips or sags. A sag is just a future ice block waiting to happen.
Code, Compliance, and Doing It Right
This isn’t just about stopping a leak. It’s about making sure water goes where it’s supposed to, every time.
Always use pipe and hose marked “NSF/ANSI/CAN 14” or “NSF-pw.” This means it’s certified for potable water and drainage. The cheap, uncertified hose from the big-box store often degrades quickly in sunlight and frost.
Your discharge pipe must maintain a continuous downward slope from the pump to its exit. Code typically requires a minimum slope of 1/8 inch per foot. Any low spot will collect water, freeze, and cause the same problem all over again. After your repair, pour a bucket of water down the line and watch it flow. If it pools, adjust your supports.
When to Call a Professional Plumber
Knowing when to stop is the most important DIY skill. If you are not 100% confident in your ability to diagnose or fix the problem safely, calling a pro is not a failure, it’s the smart move. This saves you money on bigger repairs from mistakes and prevents injury.
When NOT to Try This: The DIY Limits
Some problems look simple but hide major complications. Here is your stop sign.
- Complex Pipe Runs Inside Walls or Under Slabs: If the frozen or burst section is buried in a concrete floor or runs deep inside a finished wall, stop. You lack the tools and knowledge to locate it precisely without causing massive damage. A plumber has inspection cameras and knows how to access these lines with minimal destruction.
- Major Leaks at the Foundation Penetration: A small drip from a hose connection is one thing. If you see water actively spraying or pooling where the discharge pipe exits your home’s foundation, the issue is serious. This can indicate a cracked pipe sleeve or damaged masonry, which compromises your home’s water seal. Fixing it correctly often involves excavation and waterproofing from the outside.
- Electrical Issues with the Pump Itself This is non-negotiable. If you suspect the pump motor is fried, the float switch is faulty, or there are any problems with the wiring or GFCI outlet, do not touch it. Mixing water and DIY electrical work is how people get seriously hurt. A licensed electrician or a plumber who handles pump systems needs to handle this.
When a Pro is Legally or Practically Required
Some jobs require a license, permits, or specialized equipment. Trying to do them yourself can void your home insurance or create bigger hazards.
Repairing Buried Drainage Pipe is a classic example. The pipe that runs from your house to the street or drainage ditch is your responsibility. Digging it up requires knowing exactly where it is (call 811 first), using heavy machinery safely, and ensuring the new pipe has the correct slope. Most municipalities require a permit for this work, and they will only issue it to a licensed contractor. Getting the slope wrong means water sits in the pipe and freezes again every year.
Complex Re-routing of Discharge Lines might be needed as a permanent fix. If your current pipe route is doomed to freeze, the best solution is to reroute it through a heated space or deeper underground. This isn’t just adding a new hose. It involves planning a new path, cutting into walls or ceilings, installing proper supports, and ensuring the new route doesn’t violate building codes. A plumber will ensure the new install is both effective and legal.
Your Year-Round Sump Pump Maintenance Roadmap
The best way to handle a frozen sump pump line is to stop it from ever happening. Think of your sump pump system like your lawnmower. You wouldn’t just park it wet in the shed all winter and expect it to start perfectly in spring. It needs specific care for each season. For winter, a simple sump pump winter maintenance routine helps prevent freezing and backups. This schedule is what I follow at my own house and recommend to every homeowner.
Spring: Reconnect, Test, and Clean
When the threat of hard frost is gone, it’s time to get your pump ready for the wet season. This is a 20-minute job that pays off all summer.
- Reconnect the discharge hose. Take the hose you stored in the fall and attach it securely to the discharge pipe outside your foundation. Use stainless steel hose clamps, not the cheap worm-gear clamps that come in the box. A loose connection here is a common source of basement flooding.
- Test the pump operation. Never assume it’s working. Go to the sump pit and slowly pour a 5-gallon bucket of water into it. Watch for the float to rise, trigger the pump, and push water all the way out the end of the discharge hose. You should hear the pump run and see water flow. If it hums but doesn’t pump, the impeller might be jammed.
- Clean the sump pit. While the pit is empty from your test, check for gravel, silt, or debris. I use a shop vac to suck out any dirt. Debris can clog the pump’s intake screen or jam the float switch, causing a failure right when you need it most.
Fall: Disconnect, Drain, and Protect
This is your critical freeze-prevention work. Do this before the first hard freeze, period.
- Disconnect, drain, and store the hose. Unhook the discharge hose from the pipe outside. Lift the entire hose to drain every last bit of water out of it. Coil it up and store it in your garage or basement for the winter. Leaving it attached is the number one reason for a frozen, burst discharge line.
- Insulate the exposed discharge pipe. The short pipe sticking out of your house wall is now empty, but it can still let cold air into your basement. Slip a foam pipe insulation sleeve (like the kind for copper pipes) over it. For the opening, stuff a rag or a specific pipe insulator plug into the end to block the draft.
- Clear the exterior discharge area. Go outside to where the water normally exits. Clear away all leaves, mulch, and grass clippings for at least several feet. You want water to flow away from your foundation quickly in the spring, not pool and freeze right at the wall.
Monthly: The Simple Bucket Test
Don’t wait for a storm to find out your pump failed. Make this a habit, like checking your smoke detector batteries. Left unchecked, a failed sump pump can flood your basement and ruin valuables. Knowing these consequences helps you act quickly to prevent costly damage.
Once a month, pour that 5-gallon bucket of water into the sump pit. Listen for the pump to kick on within 10-15 seconds of the float rising. Watch for water to flow strongly from the discharge point outside. This quick test verifies the float switch, the pump motor, and a clear discharge path all at once. If it fails, you have time to fix it without an emergency. It’s just one aspect of how often you should test your sump pump.
Finding a problem during a dry monthly test gives you all the time in the world to fix it, but discovering it during a downpour gives you none.
Common Questions
What’s the very first thing I should do if I suspect a frozen line?
Immediately shut off and unplug your sump pump at the electrical source. This prevents the pump from burning out by running against the ice blockage and stops it from pushing water into a potentially burst pipe, which would flood your basement. For proper maintenance, safely disconnect the sump pump and inspect the cord and outlet for wear. Regular checks help prevent future problems.
Is heat tape safe to use on my discharge pipe?
Yes, but only if used correctly. You must use self-regulating heat tape and plug it into a GFCI outlet. Never use it on or inside the submersible pump itself, only on the exposed discharge pipe, and follow the manufacturer’s installation instructions exactly.
Why are warm towels better than a hairdryer for thawing?
Towels soaked in hot water apply gentle, even heat, which thaws the ice slowly. This reduces the risk of thermal shock, which can crack cold plastic pipes when heat is applied too quickly and intensely in one spot.
How can I tell if the pipe burst, or if it’s just blocked?
After thawing, the clearest sign is water spraying from a crack or joint. If your pump runs but no water exits outside, listen closely near the pit; you might hear water leaking back into it from a split section before it reaches the discharge point.
What’s a good temporary fix if a pipe bursts at night or on a weekend?
If you have a section of corrugated hose and clamps, you can bypass the burst PVC section temporarily. Otherwise, your only safe temporary fix is to keep the pump powered off, manage water with a utility pump or wet vacuum, and call a plumber first thing in the morning.
Your Cold-Weather Sump Pump Action Plan
Stop problems before they start by insulating your discharge hose and ensuring it has a steady downward slope away from your foundation. If a freeze happens, thaw the line safely with a heat source and immediately check for splits or cracks that need repair.
Bob is a an HVAC and plumbing industry veteran. He has professionally helped homeowners resolve issues around water softeners, heaters and all things related to water systems and plumbing around their homes. His trusted advice has helped countless of his clients save time, money and effort in home water systems maintenance and he now here to help you and give you first hand actionable advice. In his spare time, Bob also reviews home water systems such as tankless heaters, water softeners etc and helps home owners make the best choice for their dwelling. He lives around the Detroit area and occasionally consults on residential and commercial projects. Feel free to reach out to him via the contact us form.