DIY Solar Water Heater Panel: Build and Install It Right
Worried your water heater costs too much? Building a solar panel is simpler than you think.
We will cover the tools and parts you need, how to put the panel together, connecting it to your pipes, and testing for leaks.
I run service calls on these systems every week. Forget the overpriced kits, a good build uses hardware store parts and solid plumbing.
Planning Your DIY Solar Water Heater System
Do not buy a single pipe, fitting, or sheet of glass yet. Your first tool is the phone. Call your local building department. Ask about the International Plumbing Code (IPC) and any local amendments for solar thermal installations. You will likely need a permit. Failing to get a permit can void your home insurance and create a massive headache when you sell your house. This step is non-negotiable.
Calculate Your Daily Hot Water Usage
You need a target. A good estimate is 20 gallons of hot water per person, per day. For a family of four, that’s 80 gallons. Now, check your current water heater’s first-hour rating sticker. Compare the two numbers. Use the larger one as your daily goal. My household’s target was 75 gallons, which guided my entire panel and storage tank size. That brings us to choosing water heater size capacity—how large a tank you actually need. In the next step, we’ll outline how to pick the right size based on your daily and peak usage.
Flat Plate vs. Evacuated Tube Collectors
You are choosing between two main technologies. Here is the simple breakdown.
Flat Plate Collectors: A metal box with copper pipes glued to a dark absorber plate under glass. They are simpler to build, cost less, and work well in sunny climates. They can lose heat faster on cold, cloudy days.
Evacuated Tube Collectors: Rows of glass tubes with a vacuum inside, like a thermos. The vacuum is excellent insulation. They are more efficient in freezing climates and on cloudy days because they minimize heat loss. They are typically more expensive and complex to build from scratch.
For most DIYers in mixed climates, a well-built flat plate system is a solid starting point. If you regularly see sub-freezing temps, lean towards evacuated tubes or plan an exceptional drainback or glycol system for your flat plates.
How to Size Your System
Here is a reliable rule of thumb. For a flat plate collector, you need about 20 square feet of collector area for each of the first two people in your home. Add 15 square feet for each additional person. For our example family of four: 20 + 20 + 15 + 15 = 70 square feet total collector area. This area should meet 50-70% of your annual hot water needs. You cannot get 100% year-round without a massive, costly system.
Determine the Best Location
Your location choice makes or breaks performance. Roof mounts are common but consider weight and roof penetration sealing. Ground mounts are easier to service and adjust. Either way, follow these rules.
- Ideal Angle: Set the panel’s tilt angle equal to your geographic latitude. This is a great year-round average. You can adjust it seasonally on a ground mount.
- Face True South (in the Northern Hemisphere). A magnetic compass is wrong due to declination. Use a phone app or online map to find true south.
- Zero Shade: Even small shadows from a chimney or tree in winter will cripple output. Shading on the collector for any part of the day is an absolute deal-breaker. Observe the spot at 9 AM, noon, and 3 PM on a winter day.
The “Red Flag” Troubleshooting Guide
If your plan has these issues, stop and redesign.
- Chronic Low Output: Your collector area is undersized for your tank size or your daily usage.
- Morning Freeze-Ups: You plan a water-only system in a freezing climate without a foolproof drainback design.
- Constant Pump Cycling: Your differential controller settings are too tight, or your pump is oversized for the loop.
- Roof Structural Worry: You haven’t verified your roof can hold the wet weight of the system, plus snow load.
- No Expansion Tank: Planning a closed-loop with glycol but omitting an expansion tank guarantees blown seals or burst pipes.
The DIY vs. Pro Verdict
Difficulty Rating for Planning: 3 out of 10. The thinking is not hard, but it is critical. Skipping steps here-like ignoring codes or shading-dooms the project before you lift a finger. A perfect build based on a bad plan is just a fancy, expensive failure.
Sourcing Materials and Tools for the Build
Flat-Plate Collector Materials List
For one collector frame, you will need:
- Frame: 2×4 cedar or aluminum channel (cedar resists rot).
- Absorber Plate: 16-22 gauge copper or aluminum sheet, painted with high-temperature flat black paint.
- Tubing: 1/2″ type L soft copper coil for the risers. 3/4″ copper for the header pipes at top and bottom.
- Absorber Bond: High-temperature thermal epoxy or solder to attach tubing to the plate.
- Glazing: Tempered, low-iron solar glass (regular glass can shatter from heat).
- Insulation: Rigid, foil-faced polyisocyanurate board (like Thermax) for the back and sides. Minimum R-10.
- Sealants: Butyl rubber tape and silicone rated for continuous 350°F+ heat for glazing seals.
Specific Plumbing Tools Required
You cannot wing this with a hacksaw and duct tape.
- Tubing cutter for clean copper cuts
- Propane or MAPP gas torch kit with solder and flux
- Spring-type tube bender for 1/2″ copper
- Pipe deburring tool
- Adjustable wrenches and channel-lock pliers
- A pressure tester (a must for checking for leaks before insulation)
The “Closed-Loop” Component Shopping List
This is for an indirect, freeze-protected system. The solar fluid in the panels never mixes with your house water.
- Circulation Pump: A small, bronze-bodied 12V DC or 120V AC pump. Look for one designed for solar hydronic systems.
- Differential Controller: The brain. It needs two sensors (one for collector temp, one for tank temp) and triggers the pump.
- Double-Wall Heat Exchanger: A coil inside your storage tank or a separate external plate exchanger. This transfers heat from the solar loop to your potable water.
- Expansion Tank: A sealed tank to absorb pressure increases as the glycol fluid heats up.
- Air Vent & Drain Valves: For purging air and draining the loop.
- Pipe Insulation: Foam insulation for all outdoor and attic pipes.
Heat Transfer Fluids: Water vs. Glycol
This is a safety choice. Plain water is efficient and cheap, but it freezes and corrodes. A 50/50 mix of food-grade propylene glycol and water is the standard for freeze protection and corrosion inhibition in closed-loop systems. It lowers efficiency slightly but prevents catastrophic freeze damage. Ethylene glycol is toxic and not recommended for systems with a double-wall heat exchanger due to contamination risk.
Recommended Products
Focus on getting the right type, not a specific brand.
- Pump: A small, bronze-circulator style pump (e.g., similar to a Taco 007).
- Glycol: Food-grade (non-toxic) propylene glycol.
- Controller: A differential controller with two 10k-ohm temperature sensors and adjustable on/off setpoints.
- Heat Exchanger: A brazed plate heat exchanger or a dedicated solar storage tank with an internal coil.
Code & Compliance Check
Any electrical work for the pump and controller must follow the National Electrical Code (NEC). Use conduit where required. The pump and controller should be UL-listed. Your building inspector will check this. Using unlisted components is a fire hazard and will fail inspection. Also, the sump pump must be on a dedicated circuit with proper overcurrent protection. GFCI protection should be used where the code requires it.
Step-by-Step Panel Construction and Mounting
Building the Collector Box
Start with a weatherproof frame. I built mine from aluminum angle for my garage project. It holds up to the sun and rain. Cut your pieces to size and screw them together at the corners.
Line the inside bottom with rigid foil-faced insulation. This reflects heat back up. The absorber plate sits directly on top of this.
Your absorber plate is the engine; it converts sunlight into heat, so using copper sheet painted with high-temperature flat black paint is non-negotiable for good performance.
Bending and Attaching the Copper Loop
Use a tubing bender for your 1/2″ copper pipe. A clean, smooth bend prevents kinks that block flow. Plan a simple serpentine pattern that covers the plate evenly. Just be careful not to stress the pipe too much to avoid leaks.
Lay the bent tubing onto the copper sheet. Use copper pipe clips or high-temp adhesive to hold it in place. Now you solder.
Clean every joint with sandcloth until it shines. Apply flux. Heat the fitting evenly with your torch, then touch the solder wire to the joint. A good solder joint will wick the solder in smoothly, forming a clean silver ring all around; if it blobs, you need more heat on the fitting itself.
Sealing the System
You have a hot box now. It needs a lid. Tempered glass is the standard. Handle it with heavy gloves-the edges are sharp.
Set the glass into a bed of high-temperature silicone caulk on the frame’s top lip. This seals it and acts as a cushion. Use glazing clips to secure the glass from the outside.
Run another bead of the same high-temp caulk around the outside edge where the glass meets the frame. This is your weather seal.
Safe Mounting: Roof or Ground
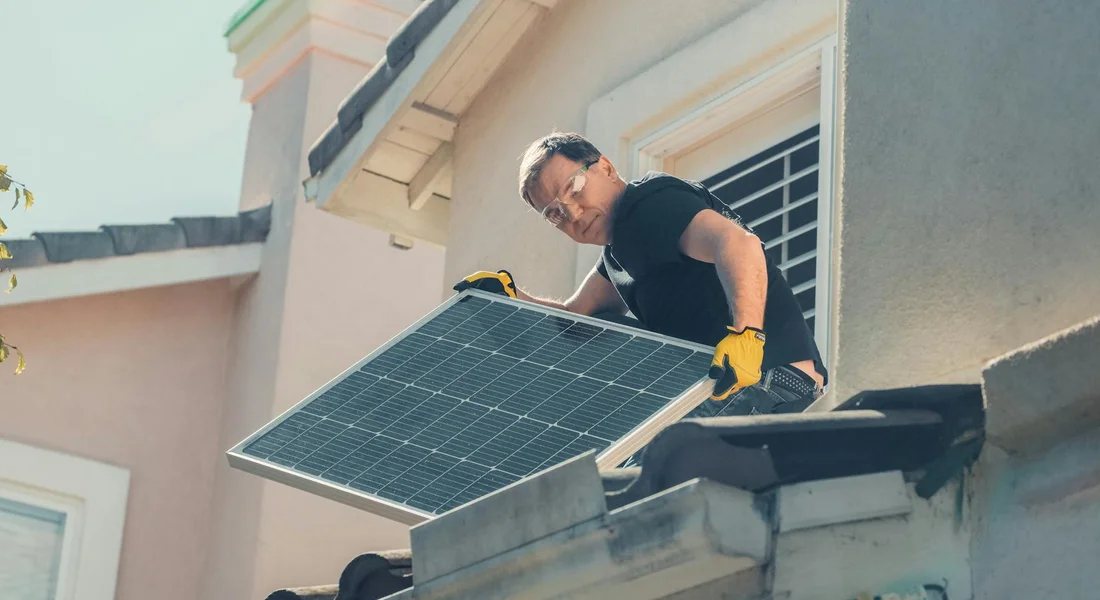
For a roof, you must find the rafters. Use a stud finder. Attach your mounting brackets directly into the rafters with long, thick lag bolts.
Any roof penetration requires proper flashing to prevent leaks; slide the flashing under the shingles above the bracket and over the shingles below it.
For a ground rack, use concrete footings. A panel acts like a sail. Calculate wind load for your area and size your footings and rack structure to handle it. Overbuild it.
Tools & Material Checklist
- Fall arrest harness and roof anchor (for roof work)
- Fire extinguisher (rated for Class A, B, C)
- Heavy leather gloves (for handling glass and metal)
- Tubing bender, propane torch, solder, flux
- Drill/driver, wrench set for lag bolts
- High-temperature silicone caulk & caulk gun
Critical Safety Precautions
Treat the roof like a construction site. Harness up. Every time. Clear the area below of debris and people when working overhead.
Soldering means open flame. Have that fire extinguisher at your side. Work on a non-flammable surface and keep all other materials away.
Wear those gloves when handling the glass and the sharp metal frame. Safety glasses are a must for cutting and drilling.
Integrating with Your Home’s Plumbing and Wiring
The Two Main Hookup Methods
You have a choice. The first is a pre-heater. Your solar panel feeds into your existing water heater’s cold water line. The tank provides backup heat on cloudy days. This is the most common DIY setup; water heater types explained.
The second is a dedicated system with its own storage tank. This is more complex and expensive but can handle all your hot water needs.
For most homeowners, using the solar panel as a pre-heater for your current tank is the most practical and cost-effective path. A solar water heating purification system can further improve water quality by filtering contaminants with solar energy. This combination helps keep your home’s supply clean and efficient.
Plumbing the Closed Solar Loop
This is a separate, sealed loop. It uses a special fluid (like propylene glycol) that won’t freeze or boil. It runs from the panel down to a heat exchanger.
The loop needs a small circulation pump and an expansion tank. The pump moves the fluid. The expansion tank absorbs pressure changes as the fluid heats up and expands.
Plumb it all with copper. Install isolation valves on both sides of the pump and heat exchanger. This lets you service parts without draining the whole system.
Basic Wiring for Control
The brain is a differential temperature controller. It has two sensors. One goes on the solar panel. The other on your storage tank.
When the panel is hotter than the tank, the controller turns on the circulation pump. Wire the controller to a power source. Then wire the pump to the controller’s load terminals.
This is low-voltage wiring typically. Follow the controller’s manual exactly. If your panel and pump are 120V, the stakes are higher. Be sure to review the well pump electrical requirements voltage to ensure proper sizing and safety. This helps verify compatibility between the panel, wiring, and pump.
Pressure-Testing the Loop
Before you fill it with expensive glycol fluid, test it with water and air. Cap all the ends. Connect a pressure gauge and a bicycle pump or small air compressor.
Pump the loop up to 1.5 times your intended operating pressure (often around 60 PSI). Shut the valve and wait. Watch that gauge for a minimum of one hour; if the pressure drops, you have a leak to find and fix.
Check every solder joint and valve connection. A small leak now is a big, expensive mess later.
Water Science Snippet
Heat moves from the hot solar fluid, through the walls of the copper heat exchanger, into your home’s cooler water. This is conduction heat transfer.
The efficiency depends on surface area-that’s why the exchanger looks like a coiled tube inside a shell. A bigger contact area transfers heat faster.
The pH of the solar fluid matters. If it becomes acidic from breakdown, it will corrode the copper from the inside out. Use a fluid designed for solar systems and check its condition yearly.
The DIY vs. Pro Verdict
Difficulty Rating: 8/10.
This phase combines advanced plumbing and basic electrical work. Soldering a pressurized, high-temperature loop is not like fixing a drain pipe. A tiny pinhole leak can cause major damage.
The wiring, even if it seems simple, often falls under code that requires a licensed electrician to sign off, especially for a permanent home system.
This is the point where a knowledgeable DIYer partners with a pro. You can build the panel and mount it. Have a licensed plumber pressure-test and finalize the loop connections. Have a licensed electrician handle the final controller and pump connections to your home’s power.
Keeping It Running: Startup, Maintenance, and Fixes
The real test of your DIY solar panel is getting it running and keeping it that way. The work isn’t over after you bolt it to the roof.
Initial Startup: Filling and Programming
You must purge all the air from the pipes. Air locks will stop the flow and your pump will just churn uselessly.
- Connect a garden hose to the drain valve at the lowest point in your solar loop, usually on the pump station. Run the hose to a bucket.
- Open the highest point vent valve (an air vent or a manual valve at the panel’s outlet).
- Open the fill valve and let the glycol mix flow in slowly. You will see air and bubbles sputter out of the vent.
- Once you get a steady stream of liquid with no bubbles from the vent, close it. Then close the drain valve.
- Turn on the circulation pump and let it run. Go back and gently crack open the high-point vent valve again to release any final trapped air. Close it when liquid appears.
Setting the differential controller is simple: you tell it when to turn the pump on and off based on temperature. A common and safe setting is to turn the pump ON when the solar panel is at least 15°F hotter than the water in your tank, and turn it OFF when that difference drops below 5°F. This prevents the system from cooling your hot water tank at night.
Your Maintenance Schedule
Neglect this, and you’ll be fixing expensive problems instead of preventing them.
- Monthly: A two-minute visual check. Look for wet spots, drips, or frost on pipe insulation. Listen for unusual pump noise.
- Annually: Check the fluid level and condition in the expansion tank. Inspect the pressure gauge. Look for any degradation of pipe insulation or mounting hardware.
- Every Two Years (Biennial): Test the freeze protection of your heat transfer fluid with a glycol refractometer. If it’s weak, drain and replace the fluid. This is the most critical maintenance task.
Common Problems and Fixes
Here’s what usually goes wrong, and how to diagnose it.
Air Lock: The pump runs but you feel no heat moving through the pipes. The pipes might even get hotter than the tank. You need to re-bleed the system using the startup steps.
Pump Failure: The controller says it’s calling for heat, but the pump is silent or humming without moving fluid. Check for power first. If power is good, the pump’s internal bearing or impeller is likely seized. Replace the pump.
Controller Errors: The pump won’t turn on or runs continuously. First, swap the sensor probes. If the problem moves, the sensor is bad. If it stays, the controller board is faulty. For more on constant running, see the well pump constant running guide. It offers step-by-step checks and safe remedies.
Loss of Heat: The system runs but doesn’t heat the tank. Check for a stuck check valve, a failed tempering valve mixing in cold water, or severely degraded glycol that has lost its heat capacity. A fluid test will tell you.
Realistic Cost and Time for a Skilled DIYer
This isn’t a weekend drip irrigation project. Be honest with your skill level.
Total Project Cost: For a single 4’x8′ panel system with a pump station, controller, plumbing, and mount, expect to spend between $1,200 and $1,800 in parts. The biggest variables are the cost of the copper panel absorber and the type of pump.
Total Time Investment: A skilled person who can solder copper, run electrical, and work safely on a roof should budget 30 to 40 hours total. This includes planning, fabrication, roof mounting, plumbing, and wiring. My own garage-built setup took three full weekends.
System Maintenance Roadmap
| Frequency | Task | Purpose |
|---|---|---|
| Monthly | Visual inspection for leaks, corrosion, or damaged insulation. | Catch small problems before they become big, expensive failures. |
| Yearly | Check expansion tank pressure and fluid level. Inspect all roof penetrations and mounting hardware. | Ensure system safety and mechanical integrity against weather. |
| Every 2 Years | Test glycol strength and replace fluid if freeze protection is below rating. | Prevent frozen, burst pipes inside the solar panel, which is a total loss. |
Common Questions
What are the most important safety rules for this project?
Treat the roof like a jobsite-use a fall arrest harness every single time. When soldering, have a Class A-B-C fire extinguisher at your side and work on a non-flammable surface. Finally, pressure-test all plumbing to at least 60 PSI for one hour before insulating; a small leak now causes major damage later.
How do I connect this to my tankless or on-demand water heater?
Direct connection is not recommended, as it can confuse the heater’s electronics and cause erratic firing. The proper method is to install a separate, insulated pre-heat storage tank that feeds the tankless unit. This gives the solar system a “battery” of hot water to work with and protects your expensive heater. This approach mirrors how indirect water heaters optimize function and efficiency by transferring stored heat to domestic water. It reduces cycling and energy loss, keeping hot water ready when you need it.
My collector is sized right, but I’m not getting enough heat. What’s the first thing to check?
Confirm there is absolutely no shade on the panel during peak sun hours, even from a thin branch. Then, check that your circulation pump is actually moving fluid by feeling for a temperature difference across the pipes. The most common culprit is an air lock, which requires re-bleeding the system at the high-point vent.
Can I use this system in a freezing climate?
Yes, but you must use a closed-loop design with a 50/50 mix of food-grade propylene glycol and water for freeze protection. Plain water will freeze and destroy your panels. Your system also requires an expansion tank to handle pressure changes and a differential controller that can trigger pump circulation to prevent stagnation overheating in summer.
Is a building permit really necessary for a DIY project?
Absolutely. This protects you. An unpermitted installation can void your home insurance and create significant legal and financial hurdles when you sell your house. The inspection ensures your plumbing and electrical work is safe, which is especially critical for a pressurized, high-temperature system on your roof.
Keeping Your Solar Water Heater Running Smoothly
Test all plumbing joints with water pressure before finalizing the installation to prevent costly leaks. Check the panel’s glass and insulation every few months for cracks or degradation to sustain heat collection.