How Do I Identify and Remove Sediment from My Water Heater?
Is your water heater rumbling or taking forever to heat up? That’s sediment buildup, and it’s stealing efficiency and threatening your tank.
We will cover spotting the warning signs, what tools to grab, and the exact steps to flush it clean.
I’ve serviced hundreds of these units. Flush your heater once a year. It prevents most major failures.
Yes, Your Water Heater Has Sediment. Here’s How to Tell.
Every tank water heater collects sediment. Minerals like calcium and lime settle out of the water as it heats up and cools down inside the tank. The real question isn’t if you have sediment, but how much you have and if it’s causing problems.
Look for these clear signs. Your water heater will tell you when the sediment level is getting bad.
- Rumbling or Popping Noises: This sounds like a kettle about to boil, but coming from your basement or closet.
- Longer Heat-Up Times: It takes forever for the water to get hot again after you use a lot.
- Reduced Hot Water Volume: Your showers are getting shorter because the tank runs out of hot water faster.
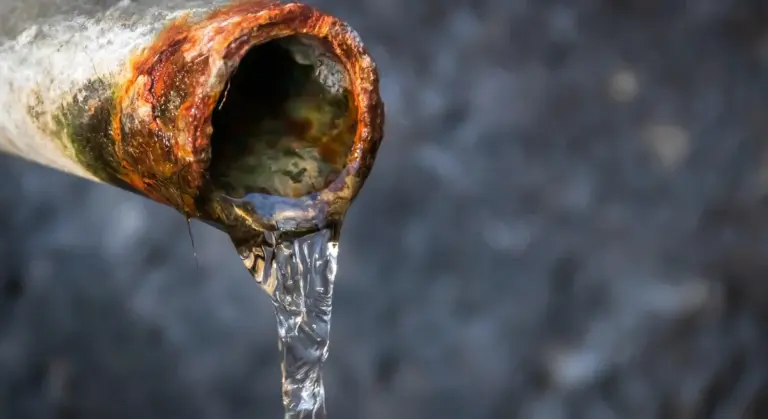
- Discolored Water: Hot water from your taps looks rusty, yellow, or has small black flecks.
The simplest check is the bucket test. Turn off the power to the water heater (switch off the circuit breaker for electric, turn the gas control to ‘pilot’ for gas) and let it sit for a couple hours to cool slightly. Attach a standard garden hose to the drain valve at the bottom of the tank. Run the hose to a floor drain, a bucket, or outside. Open the valve for just 10 to 15 seconds and catch the water. You’re looking for two things: cloudiness and grit. Clean water is clear. Problematic sediment looks like dirty water with sand at the bottom of the bucket.
Some setups are sediment magnets. If your water heater is over 7 years old or you live in a home with very hard water and no softener, sediment builds up faster. My last house had brutal hard water, and I was doing a bucket test every fall just to stay ahead of it. That buildup can sap heater efficiency by insulating the heat exchanger. Addressing it now can save energy and extend the heater’s life.
The Warning Signs You Can’t Ignore
That rumbling is a specific problem. The sediment layer at the bottom of the tank traps water beneath it. When the burner or element heats this trapped water, it can flash to steam. Those steam bubbles fight their way up through the sludge, making the popping and rumbling noise. It’s a classic sign of a serious buildup.
Sediment acts like a blanket between the heat source and the water you want to heat. The burner or element has to work harder and longer to push heat through that insulating layer. This wastes energy, and you see it on your utility bill as longer recovery times.
If your family complains about running out of hot water mid-shower, sediment is likely taking up space. Think of it like filling the bottom of a milk jug with rocks. There’s less room for the actual milk. A tank full of sediment holds less usable hot water, so it depletes faster.
What Sediment Actually Does to Your Tank (The Damage Report)
Can sediment damage your water heater? Absolutely. It’s a leading cause of premature failure. Let’s compare a clean tank to a dirty one.
In a clean tank, heat transfers evenly from the burner or element into the water. The tank’s steel floor stays at a stable temperature. In a sediment-filled tank, heat gets trapped. This causes the steel at the very bottom of the tank to overheat, far beyond its normal design temperature.
This repeated overheating weakens and warps the steel tank floor, creating stress points that can crack and lead to a leak. Once that tank starts leaking, the entire unit needs replacement. I’ve seen 5-year-old heaters fail this way, while clean ones can last 12 years or more.
Sediment also creates a corrosive environment. It holds moisture and minerals directly against the tank’s protective glass lining. This constant, wet contact can wear through the lining in spots, allowing corrosion to attack the bare steel tank wall. It’s a silent killer that works from the inside out.
For gas water heaters, sediment causes other issues. A clogged burner compartment can lead to pilot light outages or inefficient, sooty burning. The sediment itself can even get hot enough to bake into a hard, concrete-like layer that’s almost impossible to flush out without disassembly.
Gathering Your Gear: The Sediment-Flushing Toolkit

Don’t start this job by running to your basement with just a hose. You need the right tools for a clean, controlled flush. This isn’t complicated, but being prepared prevents a mess and a headache. Here is your definitive checklist.
The Essential Kit
Gather these items first. You likely have most of them in your garage or basement already.
- Standard Garden Hose: Make sure it’s long enough to reach from your water heater’s drain valve to a floor drain, a sump pit, or outside. An old hose you don’t mind getting dirty is perfect for this job.
- Flat-Head Screwdriver or 5/16″ Nut Driver: This is for the bleed valve on the pressure relief valve (the little lever on the side or top of the heater). You need to open this to break the vacuum and let the tank drain.
- Channel-Lock Pliers or an Adjustable Wrench: These are for opening and closing the main drain valve, which is usually a standard hose thread spigot.
- Heavy-Duty Work Gloves: The water coming out will be hot and may contain sharp bits of mineral scale. Protect your hands.
- A Large Bucket (5-Gallon): This is your contingency plan. If your drain valve is partially clogged or you need to control the initial flow, a bucket lets you catch the water without flooding the floor.
Your Best Tool: A Second Person
I strongly recommend you recruit a helper for this project. One person can manage the hose and watch the drain point while the other controls the valve and monitors the water flow from the top. Trying to do both at once often leads to overflows or losing control of a heavy, water-filled hose.
Optional but Highly Helpful Items
These aren’t mandatory, but they make the job safer and easier, especially if you have an older unit.
- Pump Pliers (e.g., Tongue-and-Groove Pliers): If your drain valve hasn’t been touched in years, it might be stuck. The extra leverage from a good pair of pump pliers can open it without stripping the valve.
- Safety Glasses or Goggles: When you first open the drain valve, sediment and hot water can spray out. Eye protection is cheap insurance against a painful accident.
- White Vinegar: If your drain valve is slow or clogged with sediment, you can sometimes clear it by attaching a short hose, filling it with vinegar, and letting it soak into the valve opening for an hour before draining.
The Step-by-Step Guide to a Complete Sediment Flush
To clean sediment from a hot water heater, you perform a full drain and flush. Draining alone leaves most sediment behind. This guide combines both actions for a complete clean.
Step 1: Safety First – Shut It All Down
Start by shutting off the heater’s power source. This is critical. For a gas heater, turn the gas control knob to “Pilot” or “Off.” For an electric heater, flip the dedicated circuit breaker off at your main panel. Do not skip this.
Next, find the cold water inlet valve. It’s a lever or wheel valve on a pipe connected to the top of the tank. Turn it to the closed position. The water supply is now off.
The water inside is dangerously hot, up to 140°F, and stays hot for hours even with the power off. You have two options. Wait 6 to 8 hours for it to cool naturally. Or, attach a garden hose to the drain valve, run it to a safe spot, and open the valve for a few minutes to drain off some hot water. This speeds cooling but wear gloves. Never open the drain valve on a full, hot tank.
Step 2: Connect and Open the Drain
Once the tank is cool, connect a standard garden hose to the drain valve at the tank’s base. Make sure the other end runs to a floor drain, a sump pit, or outside. The first water out will be dirty.
Go to a sink or tub in your home and open the hot water faucet all the way. This breaks the vacuum inside the tank and lets air in, which allows water to drain freely.
Now, open the tank’s drain valve. It’s usually a regular hose bib or a plastic or brass spigot. Use a pair of pliers if it’s stiff, but turn it slowly. Opening it too fast can cause a surge of water and sediment that kinks your hose or makes a mess. Let the water drain completely.
Step 3: The Power Flush – Stirring Up the Sediment
This is the most important step. With the drain hose still open and water still flowing from it, go back to the cold water inlet valve at the top of the tank. Briefly turn it back on for 30 seconds, then off again.
The incoming cold water stirs up the sediment bed at the bottom of the tank like a whirlpool. You will see muddy, brown water rush out of your hose. That’s the sediment leaving.
Repeat this process of turning the cold water on and off in short bursts. You flush a water heater effectively by agitating the tank until the water from the hose runs completely clear for a full minute. This can take several cycles if your sediment buildup is heavy.
Step 4: Closing Up and Restarting
When the hose water is clear, close the tank’s drain valve tightly. Remove the garden hose. Go inside and close the hot water faucet you opened earlier.
To refill the tank, turn the cold water inlet valve at the top all the way to the open position. Go back inside and open that same hot water faucet. You will hear air sputter out. Let it run until a steady, solid stream of water flows with no sputtering. This means the tank is full and all air is purged from the pipes.
Now you can restore power. For electric heaters, flip the breaker back on. For gas heaters, relight the pilot light following your unit’s instructions, then set the control knob to “On.” You must ensure the tank is completely full of water before restoring heat to prevent damaging the heating elements or burner. Listen for normal operation. You’re done.
DIY or Call a Pro? Making the Right Call for Your Situation
Is it safe to flush a water heater yourself? For most homeowners, the answer is a solid yes. Flushing a standard electric or gas tank water heater is a straightforward plumbing task you can learn. It involves basic tools, a garden hose, and following safety steps.
If your water heater is less than 15 years old and you have clear access to the drain valve and pressure relief valve, a DIY flush is a great skill to have. Performing this annual maintenance yourself saves money and gives you direct knowledge of your system’s condition. In my own basement, I put this task on my calendar every fall, right after I clean the gutters.
When You Should Call a Professional
Some situations move this job from a DIY project into professional territory. Here’s when to put the wrench down and pick up the phone.
- A Very Old Heater (Over 15 Years): Sediment can fuse to the tank floor. Forcing a drain valve open or disturbing heavy, hardened sediment can cause a leak you can’t fix.
- A Completely Stuck Drain Valve: If the plastic or brass drain valve won’t budge with reasonable force, a pro has the tools and techniques to free it or replace it without damaging the tank.
- Gas Line Concerns: For gas heaters, if you need to shut off the gas supply line and are not completely comfortable doing so, call a technician. Safety is non-negotiable.
- Any Leaks from the Tank Itself: If you see active corrosion or water seeping from the steel tank body, do not attempt a flush. This indicates the tank is failing and may need replacement.
Comparing the Cost: DIY vs. Pro
Let’s break down what this decision costs.
The DIY route costs your time plus a garden hose. Expect the first flush to take 1-2 hours as you learn the steps. You’ll gain the skill for future years and get an up-close look at how much sediment came out.
A professional service call typically ranges from $150 to $300 for a standard flush. You’re paying for their expertise, speed, and liability. A good pro will also perform a safety check on the anode rod, T&P valve, and burners, which can be a valuable bonus. The choice comes down to your comfort level, the condition of your heater, and the value of your time.
Keeping Sediment at Bay: Smart Prevention Habits
You want to stop the crud before it starts. It’s easier and cheaper than cleaning up a tank full of sludge later. The goal is simple: keep as much grit and minerals out of your tank as possible.
Stop sediment by flushing your heater yearly, installing a pre-filter, and managing your home’s hard water.
The Golden Rule: Annual Flushing
Flush your water heater once a year. Mark it on your calendar for the same weekend every year, like changing smoke detector batteries. This is non-negotiable maintenance — compare it with your water heater maintenance schedule.
Here is the basic process:
- Turn off the power (breaker for electric, gas valve for gas) or set it to “Pilot.”
- Connect a standard garden hose to the drain valve at the bottom of the tank.
- Run the hose to a floor drain, driveway, or large bucket.
- Open a hot water faucet somewhere in the house to prevent a vacuum.
- Carefully open the tank’s drain valve. Let it run for several minutes until the water runs completely clear.
This yearly flush kicks out the sandy sediment before it can bake into a solid layer at the bottom of your tank. If the water is still rusty or sandy after 5 minutes, let it drain longer. A tip from my own house: I do this every fall when I also check my water softener’s salt level. Pairing small tasks makes them harder to forget.
Install a Filter on Your Main Water Line
Prevention starts upstream. Installing a filter on your main water line, before the water reaches the heater, catches sediment from the city supply or your well.
You have two main filter choices:
- Spin-Down Sediment Filter: This is a simple, low-cost canister with a screen. You manually open a valve at the bottom every few weeks to “spin down” and flush out the trapped sand and silt. I have one of these on my own home’s main line. It’s brilliant for catching the visible grit.
- Whole-House Cartridge Filter: This uses a replaceable pleated sediment cartridge (typically 5 or 20 micron) to catch finer particles. It’s more thorough but requires you to change the cartridge every 3-6 months.
For most people focused solely on heater protection, a simple spin-down filter is the most practical and low-maintenance first line of defense.
Manage Hard Water with a Softener
In areas with severe hard water, the sediment isn’t just sand. It’s mineral scale-primarily calcium carbonate-that precipitates out of the hot water and coats everything. This rock-like coating is a major cause of inefficiency and failure.
A water softener exchanges calcium and magnesium ions for sodium or potassium ions. This doesn’t remove minerals but keeps them in solution so they can’t form scale.
If you have constant white, crusty buildup on faucets and poor soap lather, a softener will drastically reduce the mineral load entering your water heater. It’s a system-wide solution that protects every appliance, not just the heater, and safeguards your plumbing from limescale.
The Long-Term Alternative: Tankless Heaters
Tankless (on-demand) water heaters do not have a storage tank. They heat water directly as it flows through a heat exchanger. There is no large, standing volume of water for sediment to settle in. How tankless water heaters work differs from traditional models.
While tankless units can still get scale buildup on the heat exchanger in hard water areas (which requires occasional descaling), they completely eliminate the classic tank sediment problem. Regular inlet filtration, including a tankless inlet filter to reduce gas sediment and other particulates, can further protect the system. Switching to a tankless system is a permanent solution to storage tank sedimentation, but it’s a significant upfront investment for your entire home’s hot water system.
Common Questions
How often should I flush my water heater to remove sediment?
Flush it once a year. This is the single most effective maintenance habit to prevent severe buildup. Mark your calendar to make it a routine task.
What are the absolute must-have tools for a safe flush?
You need a standard garden hose, an adjustable wrench or pliers, a flat-head screwdriver for the pressure relief valve, and heavy-duty work gloves. Safety glasses are also a smart addition for protection from any initial spray.
When should I definitely call a professional instead of doing it myself?
Call a pro if the drain valve is completely stuck, the unit is over 15 years old, or you see active leaking from the tank body itself. Don’t force anything-safety first.
Can sediment really cause my water heater to fail?
Absolutely. Sediment insulates the tank floor from the water, causing the steel to overheat, weaken, and eventually crack. This is a leading cause of premature leaks and costly replacements, especially when considering water tank materials that may be less resistant to such conditions.
What’s the single best thing I can do to prevent sediment buildup?
Install a spin-down sediment filter on your home’s main water line. It catches incoming grit before it reaches the tank, drastically reducing the amount of material that can settle inside. This also helps deter pests and contaminants from taking hold in the tank.
Maintaining a Clean Water Heater
Your first and best defense against sediment is a simple annual flush. Make flushing your heater part of your regular home maintenance, just like changing your air filter, to prevent most problems before they start. For Rheem tankless heaters, this flush helps remove sediment and keep the unit running efficiently. Your model’s guide will walk you through the exact steps.
Bob is a an HVAC and plumbing industry veteran. He has professionally helped homeowners resolve issues around water softeners, heaters and all things related to water systems and plumbing around their homes. His trusted advice has helped countless of his clients save time, money and effort in home water systems maintenance and he now here to help you and give you first hand actionable advice. In his spare time, Bob also reviews home water systems such as tankless heaters, water softeners etc and helps home owners make the best choice for their dwelling. He lives around the Detroit area and occasionally consults on residential and commercial projects. Feel free to reach out to him via the contact us form.