Install and Wire Your Deep Well Pump: The Homeowner’s Guide to 2-Wire and 3-Wire Systems
Hooking up your deep well pump wrong can burn out the motor or leave you with no water. I’ll show you how to avoid that.
We will cover identifying your pump’s wiring type, connecting wires to the control box or pressure switch, and securing the pump in the well casing.
I’ve wired these pumps in my own well and on hundreds of service calls. Check your voltage at the breaker before you touch a single wire.
Stop! Read This First: The Non-Negotiable Safety Checklist
Electricity and water will kill you. There are no second chances. Treat every wire as live until you prove to yourself it is dead.
Your first job is to kill all power. Go to your main electrical panel and turn off the dedicated breaker for the well pump. If the breaker trips, it could be related to the well pump pressure switch. You may need to inspect the pressure switch and its wiring before moving on.
Then, you must verify the power is off with a non-contact voltage tester at the pressure switch or control box before you touch a single wire. I keep one in my toolbox and another in my pocket for jobs like this.
This work is also physically dangerous. A submersible pump is heavy. Pulling hundreds of feet of pipe and wire from a deep well is a massive, awkward job.
- Never do this alone. You need at least one helper.
- Use proper lifting gear. A well cap hoist or a sturdy tripod and winch is not a suggestion, it’s a requirement for deep wells.
- The well casing edge is sharp. It can slice through a drop pipe or your hands. Use a well seal guard.
Finally, check your local rules. Many areas require a permit for this work, and the installation must follow the National Electrical Code (NEC) and local plumbing codes. If you’re unsure, hire a licensed professional. The cost is worth the safety and compliance.
Choosing Your Pump: A Simple 2-Wire vs. 3-Wire Showdown
You’re choosing between a 2-wire and a 3-wire submersible pump. The choice has nothing to do with your well depth and everything to do with the motor’s design and how you want to deal with problems later.
The difference is simple. A 2-wire pump has all its starting components built right into the motor housing down in the well. A 3-wire pump moves those critical parts-like the starting capacitor and relay-into a separate, above-ground control box mounted on the wall.
Let’s clear this up right now: a shallow well pump does not inherently need 3 wires. I’ve installed 2-wire pumps in shallow setups and 3-wire pumps in deep ones. The wire count is about the motor’s horsepower and service strategy. To size it correctly, review the electrical specs and amperage rating of the pump. That helps ensure the wiring and breaker match the pump’s requirements.
Here is the real-world comparison you need to make the choice.
| Feature | 2-Wire Pump | 3-Wire Pump |
|---|---|---|
| Installation | Simpler. You run two wires plus a ground from the pressure switch straight to the pump. | More complex. You run three wires plus a ground from the control box to the pump, and wire the control box to the power source. |
| Common Failure Point | The starting capacitor. When it fails, the pump hums but won’t start. | The starting capacitor. When it fails, the pump hums but won’t start. |
| Cost to Fix That Failure | Very high. You must pull the entire pump from the well to access the sealed motor and replace the internal capacitor. | Low and easy. The capacitor is in the above-ground control box. You turn off the power, swap a $25 part, and turn it back on in 10 minutes. |
| Best For | Smaller horsepower motors (often 1 HP and below) where simplicity is key and well pulls are less daunting. | Larger horsepower motors and any deep well where you never want to pull the pump for a simple electrical fix. |
For my own deep well, I chose a 3-wire pump. The slightly more complicated wiring was a one-time job. The ability to fix the most common failure from my basement is a permanent advantage.
Gathering Your Tools and Parts: The Pre-Flight Checklist
Don’t head to the well with a pocket knife and hope. Get the right gear laid out first. This job is a one-shot deal; you don’t want to be 200 feet down and realize you’re missing a fitting.
Your Core Tool Kit
- Two pipe wrenches (one to hold, one to turn)
- Multimeter for electrical checks
- Trenching shovel for burying the line
- Hacksaw or PVC cutter
- Wire strippers and crimping tool
- Adjustable wrenches and screwdrivers
- Well cap installation tool (often a simple bar)
All Components Needed
Break your parts into three piles. It keeps the chaos in check.
Pump & Well Parts
- Submersible Pump: The right horsepower and gallon-per-minute rating for your well depth and home’s demand.
- Drop Pipe: This connects the pump to your tank. You need enough to reach your setting depth plus extra for above-ground connections.
- Torque Arrestor: This clamp-like device stops the pump from twisting and banging against the well casing.
- Safety Rope: A stainless steel cable or synthetic rope rated for the pump’s weight. This is a backup if the pipe fails.
- Pitless Adapter: The fitting that allows the pipe to exit the well casing below the frost line.
- Well Cap: The sanitary, vermin-proof seal for the top of your well casing.
Electrical Parts
- Submersible Pump Cable: This is not regular Romex. It’s a waterproof cable designed for constant submersion.
- Control Box (for 3-wire pumps only): This starter box mounts on the wall near the pressure tank. A 2-wire pump does not use one.
- Waterproof Wire Splice Kits: You need enough to connect the pump wires to the feeder cable. Use the crimp-and-seal type.
- Conduit: PVC electrical conduit to protect the wire run from the well head to your house.
- Wire Guards: Plastic wraps that protect the wire from rubbing against the well casing.
Tank & Plumbing Parts
- Pressure Tank: Sized for your pump’s capacity (e.g., a 20-gallon tank for a 10 GPM pump).
- Pressure Switch: Typically a 40/60 psi switch that tells the pump when to turn on and off.
- Pressure Gauge
- Drain Valve
- Fittings: Brass or stainless steel tee, nipples, elbows, and unions to connect the tank, switch, and main water line.
- Check Valve: Usually built into the pump head, but a second one above ground is good practice to prevent backflow.
A Note on Recommended Products
Not all materials are equal for a job this permanent. Here’s what I use on my own jobs.
For the drop pipe, use schedule 80 or 120 PVC. It’s thicker and more durable than the schedule 40 you use for sprinklers. I’ve pulled pumps on 30-year-old wells that used schedule 80, and the pipe was still perfect.
The wire must be labeled “submersible pump cable.” It has thick insulation and a waterproof jacket. The size (gauge) depends on your pump’s horsepower and the wire run length-check the manufacturer’s chart.
Get a neoprene torque arrestor, not a cheap plastic one. The neoprene grips the casing better and lasts decades underground without degrading. It’s a few extra dollars that buys a lot of quiet operation.
Getting the Pump Ready: Prepping for the Deep Dive
Now we move from planning to action. This is where you make the connections you can’t fix once the pump is in the hole.
Finding the Right Depth
You don’t just drop the pump to the bottom of the well. Setting it too deep can suck up sand. Setting it too high can cause it to lose prime or overheat.
Check your pump’s performance chart. It shows how many gallons per minute it can produce at different depths. You need to match that with your well’s static water level (the resting water level) and its recovery rate (how fast water refills the well). Also, note how the depth affects the pump’s flow and pressure when submerged, which is especially important for submersible well pump depth. This helps you choose a model that maintains adequate flow at your well depth.
A good rule is to set the pump at least 10-20 feet above the well bottom, but at least 10-20 feet below the static water level. This ensures the pump is always submerged. If your well is 200 feet deep with water at 50 feet, a setting around 150-170 feet is common.
Assembling the String
Do this assembly on a clean tarp or plywood. You’re handling the business end of your water system.
- Wrap the pump cable tightly along the length of the drop pipe using plastic wire guards every 20 feet. Don’t let it dangle loosely.
- Attach the safety rope to the pump’s lifting eye. Run it up alongside the pipe and cable.
- Slide the torque arrestor onto the pipe about 10-20 feet above the pump. Don’t clamp it yet.
- This is the critical step: make your electrical splice now. Strip the ends of the pump wires and your feeder cable. Use the waterproof crimp connectors from your splice kit. Crimp them, seal them, and wrap them according to the kit’s instructions. Test the continuity with your multimeter. A failed splice 300 feet down is a very expensive problem.
- Once the splice is sealed and tested, you can make the first pipe connection to the pump discharge using pipe thread sealant made for plastics.
The Lowering Process
This is a two-person job, full stop. You need someone to feed the pipe and someone to guide it into the well.
- Place the well cap, pitless adapter, and any needed tools right by the well head.
- Carefully lift the pump and guide it over the open well casing. Have your helper start feeding the pipe toward you.
- Lower the pump slowly into the casing. Your helper’s job is to ensure the pipe, cable, and rope don’t kink or twist together as you feed it in.
- Every 20 feet or so, stop and clamp the torque arrestor onto the pipe. Tighten it so it will grip the casing wall and prevent rotation.
- Continue lowering section by section, adding and joining lengths of pipe as you go. Ensure every pipe joint is perfectly straight and fully seated before gluing (if using threaded, ensure it’s tight with sealant).
- When the pump reaches your predetermined depth, secure the pipe in the well head or pitless adapter. Attach the safety rope to the approved anchor point on the well cap or head. Finally, pull up slightly on the pipe to set the torque arrestor’s grip, then make the final pipe connection above ground.
Go slow. Rushing here can cause a dropped pump or a damaged wire. Once it’s down, it’s down for good unless you’re renting a massive pull truck.
The Wiring: Connecting a 2-Wire Submersible Pump
You have a two-wire pump. Good news, the wiring is the simpler setup. You connect power directly from your breaker panel to the pump itself, with no separate control box in between.
From the pressure switch, you will run two power wires and one ground wire out to your well. Inside the well, those two power wires connect directly to the two wires coming from your submersible pump. Think of it like wiring a light switch to a light bulb, but much longer and underwater. Different well pumps require different wiring types and voltages, so understanding the available options (like common 120V or 240V configurations) will help you choose the right setup. Always refer to the pump’s specifications for the exact voltage and wire gauge requirements.
The most critical step is making a perfect, waterproof splice for the wires that will be submerged in the well. A bad connection here will fail quickly.
Step-by-Step Guide to Wiring a 2-Wire Pump
- Turn off the main breaker for the pump circuit at your home’s electrical panel. Use a voltage tester to confirm power is off at the pressure switch.
- At the pressure switch, you’ll have terminals labeled LINE (power in) and LOAD or PUMP (power out). Connect your incoming power wires to the LINE terminals.
- Run a new length of submersible pump cable (e.g., 12/2 with ground) from the pressure switch to the wellhead. Connect the two insulated wires (often black and red) from this cable to the LOAD or PUMP terminals on the pressure switch.
- Connect the bare copper ground wire from this cable to the ground terminal or wire at the pressure switch. This ground wire must run uninterrupted all the way to the pump.
- At the wellhead, you will join this new cable to the pump’s cable coming up from the well. Match the colors: black to black, red to red. Use a high-quality, waterproof underground splice kit. Follow the kit’s instructions exactly, which usually involves a heat-shrink seal filled with adhesive.
- Connect the ground wire from your house cable to the ground wire from the pump cable using a proper, corrosion-resistant brass ground clamp.
- Once all connections are tight and protected, you can carefully power the circuit back on at the breaker. The pump should start when the pressure switch calls for water.
If the pump doesn’t run, immediately turn the power back off. Double-check every connection at the pressure switch and verify you have voltage. A faulty pressure switch or a break in the long wire run are common culprits.
The Wiring: Connecting a 3-Wire Submersible Pump and Control Box
Three-wire pumps are more common for deeper wells. They need a separate control box mounted above ground. This box contains the start capacitor and relay that gives the pump motor the extra kick it needs to begin spinning.
You have three wires from the pump (typically black, red, and yellow) and a green ground wire. These connect to the control box. Power from your pressure switch feeds the control box, not the pump directly.
Mount the control box on a wall in a dry, protected location like a basement, well house, or garage, as close to the wellhead as practical. This makes testing and future service much easier.
Step-by-Step Guide to Wiring a 3-Wire Pump
- As always, kill the power at the main breaker and verify it’s off with a tester.
- Mount the control box. Run the pump cable from the wellhead into the bottom of the control box. Inside, you’ll see terminals labeled for the pump wires (e.g., 1, 2, 3 or colored screws).
- Connect the three pump wires to their matching terminals. Common configuration: black to L1, red to L2, yellow to the start terminal. The green ground wire connects to the ground screw in the box. Consult your pump and control box manuals for the exact diagram.
- Now, run a power cable from your pressure switch to the control box. Connect the two power wires from this cable to the two LINE terminals in the control box.
- Connect the ground wire from this power cable to the same ground point in the control box as the pump’s ground wire.
- Back at the pressure switch, connect the incoming power to the LINE terminals. The wires coming from the control box get connected to the LOAD or PUMP terminals.
- Before restoring power, ensure all wire connections are tight and the control box lid is secured. Turn the breaker on. The control box may hum slightly when the pump is off. When the pressure switch activates, you should hear a distinct click from the relay inside the box as the pump starts.
If the pump hums but doesn’t start, the start capacitor in the control box is likely bad. That’s a common, fixable issue. If there’s no hum or click, check for voltage at the control box LINE terminals with the pressure switch calling for water.
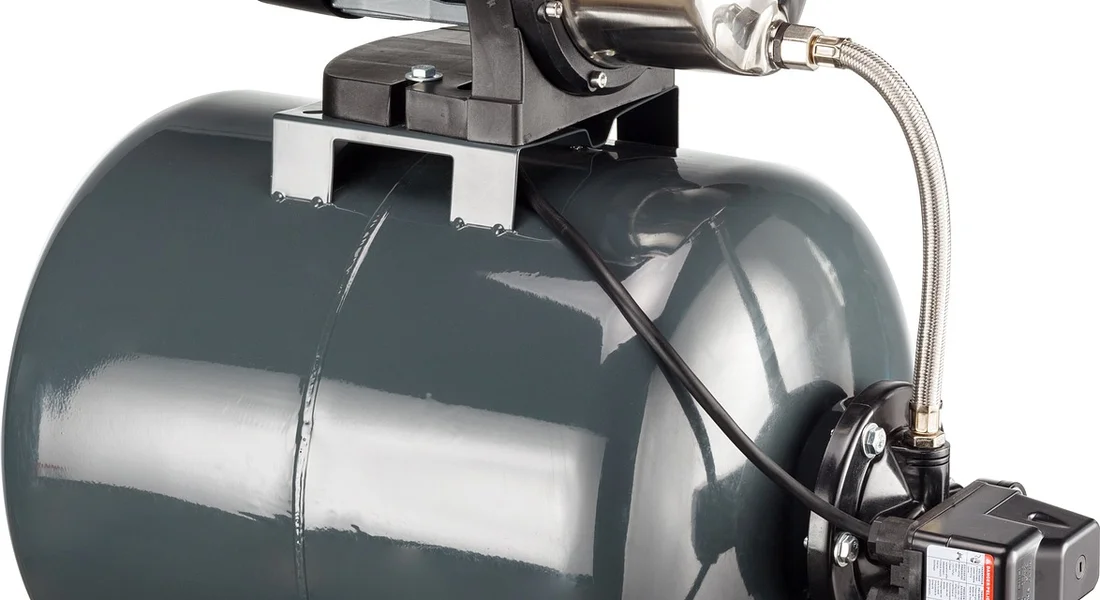
Connecting to Your Home: Pressure Tank and Plumbing
Your pump is hundreds of feet down. Now you need to bring that water into your house reliably. This is where your pressure tank and plumbing come in.
Think of the pressure tank as a battery for your water system. It stores pressurized water so the pump doesn’t kick on every time you open a tap.
Running the Water Line from the Wellhead
You’ll run a water line from the wellhead to the location of your pressure tank, usually in a basement, crawlspace, or pump house. Use 1-inch polyethylene (poly) pipe or schedule 80 PVC for this underground run; it’s the standard for a reason, balancing cost, durability, and flow. Go bigger if your pump is large or the run is very long.
Dig your trench below the local frost line. Slide the pipe through a sleeved conduit where it enters the house foundation. Use brass or stainless-steel fittings to connect the pitless adapter at the wellhead to your pipe. Plastic fittings underground can crack from shifting soil.
Hooking Up to the Tank Tee and Pressure Switch
Inside, your pipe connects to a fitting called a tank tee. This single brass manifold is the heart of your system. Everything connects here.
- The main water line from the well screws into one port.
- The pressure tank connects to a large port on the bottom or side.
- The pressure switch threads onto a small 1/4-inch port.
- Your home’s main water supply line exits from the remaining port.
Tighten everything with a proper wrench, using pipe tape or sealant on the threads. A leak at the tank tee means no pressure for your entire house, so get this connection right. My own setup uses a simple brass tee I installed fifteen years ago. It’s never leaked.
A Quick Note on Plumbing Code
Most plumbing codes (UPC, IPC) require a sediment filter and a shut-off valve immediately after the water enters the house, before the pressure tank. This catch-point protects your tank, switch, and all household appliances from sand and grit. It’s a simple spin-down filter. Install one. You’ll thank me the first time you clean out a bowlful of sediment instead of replacing a ruined pressure switch.
Start-Up, Testing, and The “Red Flag” Troubleshooting Guide
The wires are connected. The pipes are tight. Now for the moment of truth. Do not just flip the breaker and walk away.
Priming and Testing the System
A submersible pump is self-priming, but the plumbing isn’t. Follow these steps.
- Make sure the valve on the tank tee going to your house plumbing is OPEN.
- Go to a faucet closest to the pressure tank (like a basement sink) and open it wide.
- Now, turn on the circuit breaker to power the pump. You should hear it start.
- Air and water will sputter from the open faucet. Let it run until a steady, solid stream flows with no air bubbles.
- Close the faucet. Watch the pressure gauge on the tank tee. It should climb steadily until it reaches the high-pressure cutoff (usually 60 PSI) and the pump shuts off.
A smooth pressure climb and a clean shut-off mean your installation is a success. Check for any leaks at all fittings now.
Immediate “Red Flag” Troubleshooting Guide
If things don’t go smoothly, here’s what to check first. These are the top signs something is wrong.
| Red Flag | Likely Cause | What to Check First |
| No water at all from faucet | Pump isn’t running or is air-locked. | Listen at the wellhead. No hum? Verify power at the breaker and pressure switch. Check for a tripped GFCI. If it’s humming but no water, the check valve may be stuck or the drop pipe could have a major leak. |
| Pump cycles on/off rapidly (short cycling) | Waterlogged pressure tank or incorrect pressure switch settings. | Tap the tank with a wrench. It should sound hollow on top, solid on bottom. A solid ‘thud’ all over means the tank’s bladder is failed and it’s full of water. Also, check that your pressure switch cut-in (pump on) is set well above the tank’s pre-charge pressure. |
| Low water pressure throughout house | Undersized pipe, clogged filter, or failing pump. | Check and clean the sediment filter. Verify your pipe is at least 1-inch. If pressure is fine with no water running (e.g., 50 PSI) but drops to a trickle when you open a faucet, the pump may be struggling to keep up. |
| Strange noises (grinding, screeching) from well | Pump motor bearing failure or impeller jam. | This often means the pump is dying. Power it down immediately to prevent further damage. The pump may have sucked in debris or the motor bearings have worn out from sediment. |
| Circuit breaker trips immediately | Direct short in wiring or a seized pump motor. | Disconnect the pump wires at the pressure switch. If the breaker still trips, the problem is in your household wiring. If it holds, the short is in the pump or the underground wire to it. This usually requires a pro. |
Keeping It Flowing: Your Submersible Pump Maintenance Roadmap
Think of your pump and pressure tank system like a car. You don’t need to be a mechanic, but regular checks keep it running for years and prevent a costly breakdown at the worst time.
This is your simple checklist. Stick to it, and you’ll know your system inside and out.
Your Annual and 5-Year Maintenance Schedule
Mark your calendar for this simple routine. An hour once a year saves thousands and a lot of headaches.
- Every Year: Check pressure tank air charge, listen for unusual pump sounds, and test basic water quality.
- Every 5 Years: Have a professional perform a full well inspection, including a drawdown test to check pump performance and well yield.
The Annual Checks You Can Do Yourself
Start by turning off the pump’s circuit breaker. Safety first, always.
Checking and Adjusting the Pressure Tank Air Charge
This is the most common fix for a pump that short cycles. You need a standard tire pressure gauge.
- Shut off the pump’s power.
- Open a faucet to drain the system and release all water pressure.
- Find the air valve on the pressure tank (it looks like a tire valve).
- Check the air pressure with your gauge. It must be 2 psi below the pump’s cut-in pressure. For a common 40/60 pressure switch, that means 38 psi.
- If it’s low, use an air compressor to add air until you hit the correct psi. If the tank won’t hold air, the bladder inside is ruptured and the tank needs replacing.
I check the tank in my own basement every spring. It takes five minutes and has caught a slow leak twice.
Listening for Unusual Pump Sounds
With the power back on, run water and listen at the wellhead or pressure tank.
- A steady hum is normal.
- A grinding or screeching sound often means a failing motor bearing.
- Clicking from the pressure switch is normal, but rapid clicking on and off every few seconds means the pump is short cycling, usually due to low air charge or a waterlogged tank.
Testing Water Quality
Changes in your water can signal pump or well issues. Fill a clear glass from a cold tap and let it sit.
- Sand or grit: This can wear out the pump impellers. It might mean the well screen is failing or the pump is set too low.
- Discoloration or odor: While often a well issue, a failing seal on the pump can sometimes allow surface water to contaminate the supply.
What You Can Fix vs. What You Can’t
The submersible pump unit itself is sealed. There are no user-serviceable parts down that well. If the motor or impellers fail, the pump gets pulled and replaced. For certain failures, however, it may be possible to repair or rebuild submersible well pumps instead of a full replacement. Understanding these repair options can help you weigh costs and downtime.
The good news is you can maintain everything else. The pressure switch, the control box (for 3-wire pumps), and the pressure tank are all accessible and replaceable. A faulty pressure switch is a common, $25 fix. A buzzing control box capacitor is another easy swap.
Lifespan and Signs of Replacement
A good submersible pump lasts 15 to 25 years. You’ll know it’s nearing the end not by its age, but by its symptoms, similar to how you can’t tell a well pump’s lifespan just from its rental or depreciation time.
Watch for these signs:
- Loss of water pressure that adjusting the tank air charge doesn’t fix.
- The pump runs constantly but can’t build to cut-off pressure.
- A massive increase in your electricity bill, indicating the motor is struggling.
- Frequent sediment in your water, suggesting internal wear.
- The pump trips the circuit breaker repeatedly.
When you see these, start budgeting for a replacement. It’s not an emergency yet, but it’s coming. Pulling a deep well pump is a job for a pro with the right heavy-duty equipment.
Common Questions
What are the most critical safety steps before I even touch the pump?
First, kill the power at the main breaker and verify it’s off at the pressure switch with a voltage tester-never trust a flipped switch alone. Second, never attempt to lower or pull the pump by yourself; you need a helper and proper lifting equipment. These two steps non-negotiable for preventing electrocution and serious injury.
How do I decide where to set the pump in the well?
You need to set it below the static water level but well above the well bottom to avoid sand. A common rule is 10-20 feet above the bottom and at least 10-20 feet below the water level. Always consult your pump’s performance chart to match its capacity with your well’s recovery rate.
Where should I install the control box for a 3-wire pump?
Mount it in a dry, protected location like a basement or well house, as close to the wellhead as practical. This gives you easy access for testing and service. Ensure it’s securely fastened to the wall and the wiring enters through the proper conduit knockout.
How do I know if my wiring splices are secure before lowering the pump?
After making your waterproof crimp connections, you must test for continuity with a multimeter before the splice is sealed and submerged. A failed connection here means pulling the entire pump. Follow the splice kit instructions meticulously-this is not a step to rush.
What’s the final sign that my installation was successful?
After priming, the pump should build pressure steadily to its cut-off point (e.g., 60 PSI) and shut off cleanly. You should hear a distinct click from the pressure switch and see a solid stream of water at a faucet with no air sputtering. Immediately check all fittings for leaks once the system is pressurized.
Before You Turn the Power On
The only way to get this right is to methodically check your electrical connections and your pipe seals before the pump goes in the hole. Get that part wrong, and you are pulling everything back up. A careful installation now means years of reliable water with no surprises.
Bob McArthur
Bob is a an HVAC and plumbing industry veteran. He has professionally helped homeowners resolve issues around water softeners, heaters and all things related to water systems and plumbing around their homes. His trusted advice has helped countless of his clients save time, money and effort in home water systems maintenance and he now here to help you and give you first hand actionable advice. In his spare time, Bob also reviews home water systems such as tankless heaters, water softeners etc and helps home owners make the best choice for their dwelling. He lives around the Detroit area and occasionally consults on residential and commercial projects. Feel free to reach out to him via the contact us form.