How to Hide and Protect Your Water Tanks, Heaters, and Sump Pumps
Those bulky tanks and pumps are ugly and vulnerable. Here’s how to clean up your space and prevent costly failures.
This guide walks you through practical hiding solutions, essential protection steps, and maintaining critical access.
I’ve been on hundreds of service calls for damaged equipment. One rule never changes: blocking your water heater’s vents is a sure way to kill it.
The Smart Reasons to Tuck Your Tanks and Pumps Out of Sight
Hiding your water equipment is not just a decorating trick. It is a direct plan to extend its life and keep your home safer. Think of it as putting your car in the garage. You do it to protect the paint from the sun and the engine from the cold. You do it so the kids don’t hit it with their bikes. Your water system deserves the same care.
Leaving tanks and pumps exposed invites trouble. Here are the core dangers you stop by covering them up.
- Physical Dings: A pressure tank in a laundry room can get hit by a laundry basket. A sump pump in the basement can be knocked by stored boxes. Even small dents can weaken metal and lead to leaks.
- Freezing Temperatures: An uninsulated tank in a cold crawl space or garage can freeze. The water inside expands. This can burst the tank or crack critical valves and pipes.
- UV Damage: Sunlight breaks down materials. Plastic components become brittle. Rubber seals dry out and crack. This happens slowly, but it guarantees an early failure.
- Tripping Hazards: Pipes, discharge hoses, and electrical cords lying across a floor are dangerous. Tucking them away prevents falls and protects the connections from being yanked loose.
You are protecting a major home investment, and a little effort now prevents costly repairs later.
How to Hide and Protect Your Water Tank (and Well Pump)
This process has two parts. Hiding makes your space look better. Protecting makes your system last longer. You often do both at the same time. We will focus on common above-ground pressure tanks and the well head equipment you see outside.
The Simple Cover-Up: Enclosures and Covers
Your first option is to build a box around it or slip a cover over it.
You can buy ready-made tank covers. These are often made of vinyl or composite plastic. They fit over the tank like a sleeve. The key feature to look for is breathability. A solid plastic cover will trap moisture against the tank. This causes condensation, which leads to rust and corrosion. A breathable fabric or a cover with ventilation slots is much better.
For a more custom look, build a simple wooden cupboard. Use plywood or finished boards. Leave the back open or use a slatted design for air flow. Do not seal it tight. Remember, a technician will need to get to the tank’s pressure gauge and air valve. Design a door that opens fully or a panel you can easily remove.
For well pump pipes and above-ground well heads, camouflage is easier. You can slide a large-diameter PVC pipe sleeve over vertical pipes. Paint metal components a flat green or brown to blend with the landscape. Just never obstruct the well cap’s seal or vent, especially if you’ve installed a well pump cover for weather protection.
Using Landscaping to Camouflage a Water Tank
Plants and fences are great for hiding outdoor equipment. A little planning keeps it functional.
- Use shrubs or ornamental grasses. Choose plants that stay neat and do not drop excessive leaves. Boxwoods or certain grasses work well. Plant them a few feet away from the tank.
- Install lattice panels or a short decorative fence. This creates a dedicated utility screen. It blocks the view but still allows air to circulate.
Service access is non-negotiable. Do not plant thorny bushes like roses right against the tank. A technician needs room to work with tools. They should not have to fight through a jungle to check your pressure switch. Leave a clear path that is at least as wide as the tank itself.
Create a solid base. Place the tank on a bed of gravel or concrete pavers. This keeps the area dry and prevents the tank from sitting in mud. It also makes it easier for you or a pro to walk around it for service.
The Water Science of Protecting Your Tank: Temperature and TDS
Protection is about controlling the environment. Temperature is the biggest factor.
Cold air affects your pressure tank’s internal air charge. The air bladder inside contracts when it gets cold. This makes the tank feel soft and gives you poor water pressure. In a freezing space, the water inside can turn to ice and rupture the tank completely.
Extreme heat and sun cause other problems. Warm water holds less air and more dissolved minerals. Over time, this can accelerate scale buildup, related to Total Dissolved Solids (TDS), inside your water heater or other appliances connected to the tank.
The solution is a foam insulation blanket. You can buy these pre-cut for standard water heaters, and you can wrap them around pressure tanks. This keeps the internal temperature more stable. Using a heater blanket saves energy and money by reducing heat loss. In time, the savings can add up on your utility bill. It prevents freezing in winter and reduces the workload on your system in summer. Just like with a cover, do not block air flow or access to valves and gauges.
How to Hide and Protect Your Water Heater (Tank and Tankless)
Can you cover a water heater? Yes. Can you cover a tankless water heater? Yes, but the rules are much stricter. The goal is to conceal the unit without causing a fire hazard, blocking service access, or violating building codes. Indoor setups in basements or utility closets are the most common, but more homes are installing tankless units on an exterior wall outdoors. When doing so, it’s important to properly insulate the outdoor tankless water heater.
For a standard tank heater, a simple enclosure box is often safe if built correctly, while a tankless model demands a specialized, vented cover to function and remain safe. Outdoor units need protection from the elements more than they need hiding.
Building a Safe and Accessible Water Heater Enclosure
Choose your material based on your skills, budget, and location. Here’s a quick comparison:
| Material | Pros | Cons |
| Wood (Plywood, MDF) | Easy to work with, paintable, affordable. | Can warp from humidity, is combustible. Not for direct contact with gas units. |
| Metal (Sheet metal, duct board) | Non-combustible, durable, modern look. | Harder to cut and shape, can be noisy, may have sharp edges. |
| Acrylic or Polycarbonate | Allows you to see the unit, non-corrosive, easy to clean. | Can scratch easily, more expensive, can trap heat if not vented. |
The non-negotiable rule is you must maintain all required clearances for vents, air intake, and service panels. This information is on the unit’s label or in the manual. Ignoring it risks carbon monoxide buildup or fire.
To build your DIY box, first find the clearance requirements. Let’s say your tank needs 6 inches on all sides. Measure the heater’s width and add 12 inches (6 left + 6 right). Do the same for depth and height. That’s the minimum interior size of your box. My own basement cover gave a full 8 inches of side clearance for easy anode rod access.
Special Rules for Hiding a Tankless Water Heater
Tankless water heaters are different. They need massive airflow for combustion to ignite and to cool the heat exchanger during operation. A sealed box will starve the unit of oxygen and cause it to fail or shut down. Unlike traditional systems, tankless water heaters work by heating water on demand.
Louvered or vented metal covers are the only safe option for enclosing a tankless unit, especially an indoor gas model. These are often sold as “tankless water heater jackets” and are designed to meet clearance and airflow specs. For an indoor unit, you must also ensure the exhaust vent terminal outside remains completely unobstructed.
Never use a solid cabinet or a blanket. A cover that traps exhaust gases, even partially, can force deadly carbon monoxide back into your home. If you’re unsure, installing a simple wall-mount shelf above it for storage is a safer way to use the space.
Protection Beyond the Box: Insulation and Freeze Guards
Hiding the heater is one thing, protecting its efficiency is another. Insulate the first 3 to 6 feet of the hot water pipe coming from the heater. Use pre-slit foam pipe insulation. This simple step reduces heat loss, so you get hot water faster and save energy. Also, choosing the best water heater temperature improves safety and savings. A safe, efficient setting reduces scald risk and lowers energy use over time.
For outdoor units, freezing is the real threat. While many have built-in freeze protection, adding a faucet cover or a dedicated, UL-listed water heater insulation jacket provides a critical backup. Never use an indoor cover on an outdoor unit; it will trap moisture and cause rust or mold.
How to Hide and Protect Your Sump Pump System
You don’t so much hide a sump pump as you make its pit lid safe and less of a tripping hazard. The real protection work happens outside at the discharge point.
Concealing an Indoor Sump Pump Pit
The standard white plastic lid is functional but ugly. You can build a simple, removable wooden lid cover that looks like part of your basement floor. Cut a piece of 3/4-inch plywood slightly larger than the pit lid. Glue laminate flooring planks to its top to match your floor. Attain a handle to one side for easy lifting. This sits over the existing lid, hiding it completely.
Using a sealed, gasketed lid replacement controls basement humidity and prevents musty sump odors from escaping into the room. If you don’t want to build, a lightweight rubber mat or a small, washable area rug can disguise the lid while still allowing access.
Protecting the Outdoor Discharge and Pump
The outdoor discharge pipe is where systems fail. In winter, a vertical pipe can freeze solid, causing the pump to burn out. A simple discharge pipe cover, which looks like a short, slanted downspout extension, prevents freezing and stops leaves and rodents from crawling in.
For a neater look, bury a solid PVC pipe extension to direct water 5 to 10 feet away from your foundation. Use a pop-up emitter at the end so it’s only visible when water flows. Disguise the discharge area with a bed of river rock; it looks tidy, prevents erosion, and stops the water from creating a muddy pit in your yard.
Tools and Materials You’ll Need for the Job
Before you start, get your gear ready. Hiding equipment and protecting it from cold are two different jobs. You need different stuff for each.
For Basic Hiding Projects (Enclosures & Camouflage)
This is for building a simple wood cover or a lattice screen. Think of it like a basic carpentry project.
- Measuring Tape and Level: Nothing looks worse than a crooked cover. Measure twice, cut once.
- Saw and Drill/Driver: A circular saw for cutting panels and a drill for making holes and driving screws.
- Outdoor-Rated Screws and Hardware: Regular screws will rust. Use deck screws or other corrosion-resistant types.
- Building Lumber or Fence Panels: Pressure-treated wood or cedar are good, durable choices for damp areas like basements or utility rooms.
- Lattice Panels and Gravel: These are your go-tos for outdoor camouflage around things like well tanks or outdoor pump covers.
- Landscaping Fabric: Place this under gravel to prevent weeds from growing up around your equipment.
For Protection Projects (Insulation & Freeze Prevention)
This kit is about function, not looks. It keeps your systems running when temperatures drop.
- Water Heater Insulation Blanket: For older tanks without great internal insulation. Check your manual first, some new models warn against it.
- Foam Pipe Insulation Sleeves: These slit foam tubes are for PEX or copper pipes. They are for protection from freezing and heat loss, not for hiding pipes.
- HVAC Foil Tape or Cable Ties: To seal the insulation blanket seams and secure pipe sleeves. Don’t use duct tape, it fails.
- PVC Cement and Primer: If you’re adding a drain line extension to a sump pump, you’ll need this to make watertight joints.
- Gravel: For improving drainage around buried tank access lids or outdoor pump pits.
The DIY vs. Pro Verdict: What You Can Safely Handle
Know your limits. Getting this wrong can cost thousands in water damage or create a dangerous situation.
Safe DIY Projects (Difficulty 2-4/10)
If you can swing a hammer and follow instructions, you can handle these.
- Building a Wooden Enclosure (3/10): A simple box with a removable panel for access. Just leave plenty of clearance (check your manual for specs, usually 6-12 inches) around vents and service valves.
- Installing Pipe Insulation Sleeves (2/10): Snip the foam to length, wrap it around the pipe, and seal the seam with tape. Easy.
- Adding a Water Heater Blanket (3/10): Wrap it, tape it, cut out areas for controls, valves, and the top and bottom. Don’t cover the thermostat or burner compartment.
- Landscaping Camouflage (4/10): Using lattice, shrubs, or a gravel bed to hide an outdoor well tank. Keep plants back for service access.
Call a Licensed Professional (Difficulty 9/10+)
This is non-negotiable. Messing with these systems can lead to fire, explosion, carbon monoxide poisoning, or severe flooding.
Any project involving gas lines, electrical connections to the appliance, or altering vent ducts requires a licensed plumber or HVAC tech.
- Relocating a Gas Water Heater (10/10): This involves gas pipe work, new venting, and water connections. A pro handles the permits and safety checks.
- Modifying Venting for a Gas or Propane Appliance (10/10): Even extending a flue pipe wrong can cause deadly CO to spill into your home.
- Hardwiring a Sump Pump or Complex Plumbing Re-routes (9/10): If your hiding project requires moving the pump or cutting into main drain lines, call a plumber.
I built a nice wooden screen for my basement water heater myself. It has two hinged doors for full access to the drain valve and pressure relief valve. But when I needed to replace that heater last year, I hired a pro to disconnect the gas and plumbing. That’s the smart split. You do the cosmetic shell, they handle the lifeblood of the system.
Red Flags: When Your Hiding Job is Causing Problems
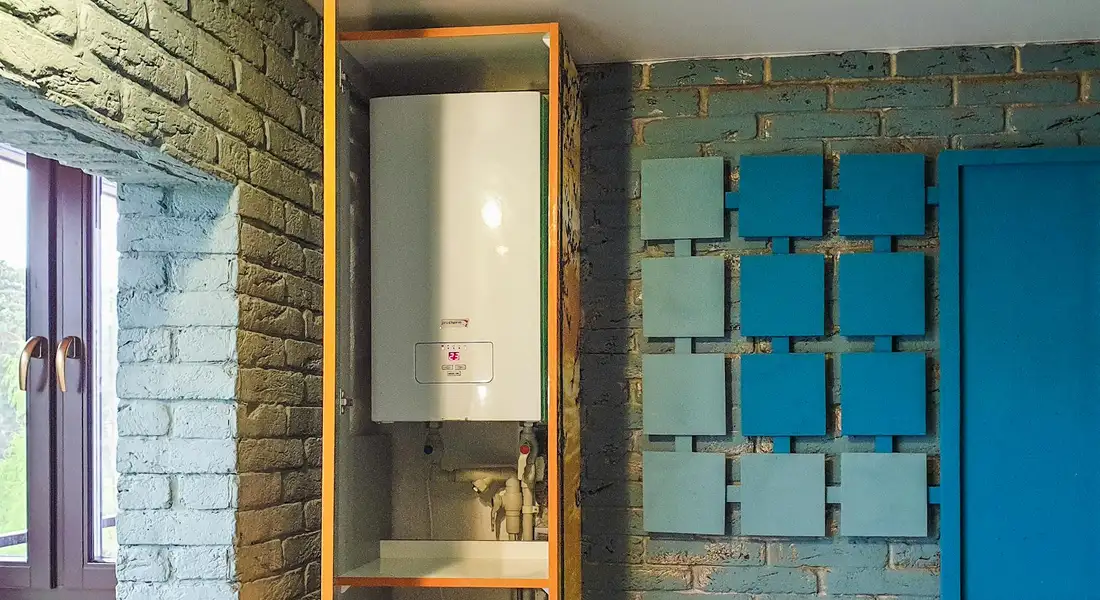
Putting a box around your equipment is easy. Making sure that box doesn’t create a new problem is the real job. Ignoring these warnings can lead to expensive repairs or dangerous situations.
Your nose is your first line of defense. A rotten egg smell near a gas water heater means a potential gas leak. A sharp, burning electrical smell near a covered sump pump or water softener means something is overheating. These are not “wait and see” issues.
Listen to your water flow. If your hot water pressure drops after you build an enclosure, you likely restricted the air intake or exhaust vent on a gas water heater. This is a serious carbon monoxide risk. For electric heaters or pumps, a constant hum or a pump that runs non stop points to an overloaded motor struggling in a hot, enclosed space.
Look for moisture. Visible water droplets, rust streaks, or mold growth on the outside of a tank or the inside of your cover means condensation isn’t drying. This rots wood, rusts metal, and breeds mold.
If you notice any of these red flags, your only move is to immediately remove the cover or open the enclosure fully to restore proper ventilation and access. If the strange smell or performance issue continues after uncovering the equipment, turn off the power or gas supply to that unit and call a technician.
Your System Maintenance Roadmap
Hiding your system cannot mean forgetting about it. Think of your cover as a removable access panel, not a permanent seal. Here is the simple schedule I use in my own home.
Seasonal and Annual Tasks
- Test Your Sump Pump Every Spring: Before the heavy rains hit, pour a 5 gallon bucket of water into the sump pit. The pump should kick on, move the water out, and shut off automatically. If it doesn’t, you found the problem before your basement floods.
- Flush Your Water Heater Annually: Connect a garden hose to the drain valve, run it to a floor drain or outside, and open the valve. Let it flow until the water runs clear. This removes sediment that reduces efficiency and lifespan. My last heater lasted 14 years because of this one habit.
- Check Pressure Tank Air Charge Every 6 Months: Shut off the pump power. Drain all water from the tank. Use a tire gauge on the air valve (Schrader valve). Compare the reading to the cut in pressure setting on your pressure switch. It’s usually 2 PSI below. For example, a 40/60 psi switch needs 38 psi in the tank.
The Golden Rule of Access
Every panel, door, or curtain you install must come off without tools, or at most, a simple screwdriver. You will not stick to a maintenance schedule if it requires a full carpentry project to get started.
Any cover that makes routine service a major chore will eventually lead to neglected maintenance and premature system failure. Design for easy removal first, aesthetics second. Use magnetic catches, simple latches, or lightweight panels you can lift off by hand.
The Code and Compliance Check
Before you build anything, you have to check the rules. Ignoring building codes and manufacturer rules can create a fire hazard, void warranties, or make your system fail. Your first stop is the International Residential Code (IRC).
The IRC requires specific clearances around fuel-burning water heaters, typically 18 to 24 inches, to ensure proper combustion air and prevent fire risk. Electric water heaters also need space for service access. For sump pumps, the discharge pipe must extend far enough from your foundation, often 6 to 10 feet, to prevent recycled water from seeping right back in.
Any permanent box or wall you build is considered an enclosure. Your local fire code may require these materials to have a specific flame-spread rating. Using plain wood or flammable panels is often not allowed.
The most critical rule is in your appliance’s installation manual. Manufacturer instructions for clearances, access panels, and ventilation always override general code. I keep my water heater manual in a binder in the basement. I checked it before building a simple slatted screen, which needed to be 22 inches away per the manual, not the 18 inches sometimes cited in code. This was especially important as it was in a confined space like an attic.
When NOT to Try to Hide Your Water System
Some systems should stay in plain sight. Hiding a problem is a bad plan. Here are the deal breakers.
- A rusty, old water heater that you’re nursing along with frequent anode rod changes or element replacements. You’ll need to get to it often, and it could fail at any moment.
- A sump pump crammed into a tight, wet corner of the crawl space. If it’s hard to reach now, boxing it in will make future service or emergency replacement a nightmare.
- Any tank, pump, or softener currently showing signs of a leak, unusual noise, or malfunction. The moisture will rot any enclosure and create mold.
You must fix the mechanical problem first, then worry about cosmetics. A leak will not fix itself because you put a pretty door in front of it. Addressing the underlying issue is the only reliable path to a clean, protected installation.
Recommended Product Types for a Clean Look
The right products hide your gear and protect it. You want solutions that look tidy and don’t cause new problems.
Look for Louvered Utility Closets
A good utility closet is more than a box. Look for one with adjustable louvers or slats on the door. These allow vital airflow around your water heater and softener. A solid door can trap heat and cause performance issues or even safety hazards with gas appliances. Proper airflow prevents overheating and ensures combustion appliances work safely, making a louvered closet a must-have for any mechanical room. Many are designed as simple DIY kits with metal frames and wood or metal panels.
Insulated Water Heater Blankets with Proper R-Value
An old, uninsulated tank can look like industrial clutter. A fitted insulation blanket cleans up the look and saves energy. Don’t just grab the first one you see. Check the R-value, which measures insulating power. Aim for a blanket with an R-value of at least 8 for meaningful energy savings and a cleaner, more uniform appearance on the tank. Critical safety note: Never cover the top of a gas water heater, the temperature/pressure relief valve, or the control panel on an electric unit.
Commercial-Grade Sump Pump Lid Seals
A flimsy lid lets in cold drafts, radon gas, and pests. It also lets out moisture and noise. A commercial-style sealed lid is a game changer. These are heavy-duty plastic or rubber gaskets that create an airtight seal over your sump crock. Upgrading to a sealed lid drastically reduces basement humidity and noise, while giving your floor a clean, finished look. Ensure the model you choose has a removable plug or a sealed port for the discharge pipe.
Pre-Fab Vinyl Well Cover Boxes
That ugly well casing sticking out of your yard is a trip hazard. A pre-fabricated vinyl well cover box solves this. It’s a hollow, landscapable box that slips over the casing. Look for one with a removable top for service access. These boxes are durable, won’t rot, and you can cover them with mulch or stones to blend them seamlessly into your garden beds. Just make sure the interior is large enough to provide the required clearance around your wellhead for servicing.
Use Pressure-Treated Wood or Composite for Outdoor Projects
If you’re building a custom enclosure for an outdoor pump or tank, material choice is everything. Standard pine will rot in a season. Use pressure-treated lumber rated for ground contact, or better yet, a composite decking material, as both will resist moisture and insect damage for years. Always build the enclosure with a sloped roof to shed water and leave generous access panels for maintenance.
Metal Mesh for Vents That Need Visibility and Airflow
Some vents, like those for a drain tile system or crawl space, can’t be fully blocked. But a gaping hole looks bad. The solution is a sturdy metal mesh or grate. A galvanized steel mesh covers the opening to keep out animals and large debris while maintaining the critical airflow your foundation needs to breathe and stay dry. Paint it to match your siding or foundation for an even cleaner finish.
Common Questions
Can I use a regular furniture cabinet to hide my water heater?
No. Standard cabinets are flammable and restrict critical airflow, creating a serious fire or carbon monoxide hazard. You must use non-combustible materials and design any enclosure to meet the manufacturer’s specified clearance distances, which are always listed on the unit’s label.
What’s the biggest mistake people make when hiding an outdoor tankless unit?
Using a solid, unvented cover. Tankless heaters need massive airflow for combustion and cooling. A sealed box will starve the unit, causing failure and potentially forcing exhaust gases back into your home. Only use a manufacturer-approved, louvered metal cover designed for outdoor tankless models. Debunking common tankless myths helps homeowners separate fact from fiction when planning outdoor installations. Proper ventilation and the right enclosure are part of what actually keeps these systems safe and efficient.
I’ve hidden my sump pump with a custom lid. How do I make sure I can still maintain it?
Your lid must be removable without tools-think handles, not screws. You need to test the pump with water every spring and visually check for debris quarterly. If getting to the pump is a chore, you’ll neglect it, and that’s when backups happen.
Are there any materials I should absolutely avoid for building an enclosure?
Avoid solid plastic sheeting or non-breathable fabrics that trap moisture and cause rust. For gas appliances, never use standard wood paneling or MDF directly against the unit due to combustion risk. Always prioritize fire-resistant, moisture-tolerant materials and maintain air gaps.
My equipment is now hidden. How do I remember to check on it?
Treat your cover like an access panel, not a seal. Put a recurring reminder in your phone for seasonal checks: test the sump pump in spring, flush the water heater in the fall, and visually inspect all equipment monthly for leaks or strange sounds during normal use.
Protecting Your Systems for the Long Run
Your goal is to hide your systems without hiding them from yourself. Before you build any enclosure, clear a permanent, easy path for servicing and emergencies. Make a habit of checking your hidden setup at least once a year for leaks, pests, or blocked airflow.
Written by Bob McArthur. Bob is a an HVAC and plumbing industry veteran. He has professionally helped homeowners resolve issues around water softeners, heaters and all things related to water systems and plumbing around their homes. His trusted advice has helped countless of his clients save time, money and effort in home water systems maintenance and he now here to help you and give you first hand actionable advice. In his spare time, Bob also reviews home water systems such as tankless heaters, water softeners etc and helps home owners make the best choice for their dwelling. He lives around the Detroit area and occasionally consults on residential and commercial projects. Feel free to reach out to him via the contact us form.